Azure Deployment Process

The Azure deployment of the Self-installed Institutional Vault involves distinct, secure setup steps that leverage separate Azure Key Wallet instances to guard each of the MPA Nodes. This ensures that no single party has access to multiple master key shards.
Prerequisite
- To execute the installation, the admin must have basic knowledge of Azure deployment and familiarity with the command line interface.
Note:It may be necessary to increase the usage quota for the
Standard_DC4as_v5instance type. The guide to increase the usage quota can be found here.
- The admin must have Kubernetes knowledge.
- The admin must have Owner permissions to install to the Azure Subscription.
- Perform okta configuration. For details, please refer here.
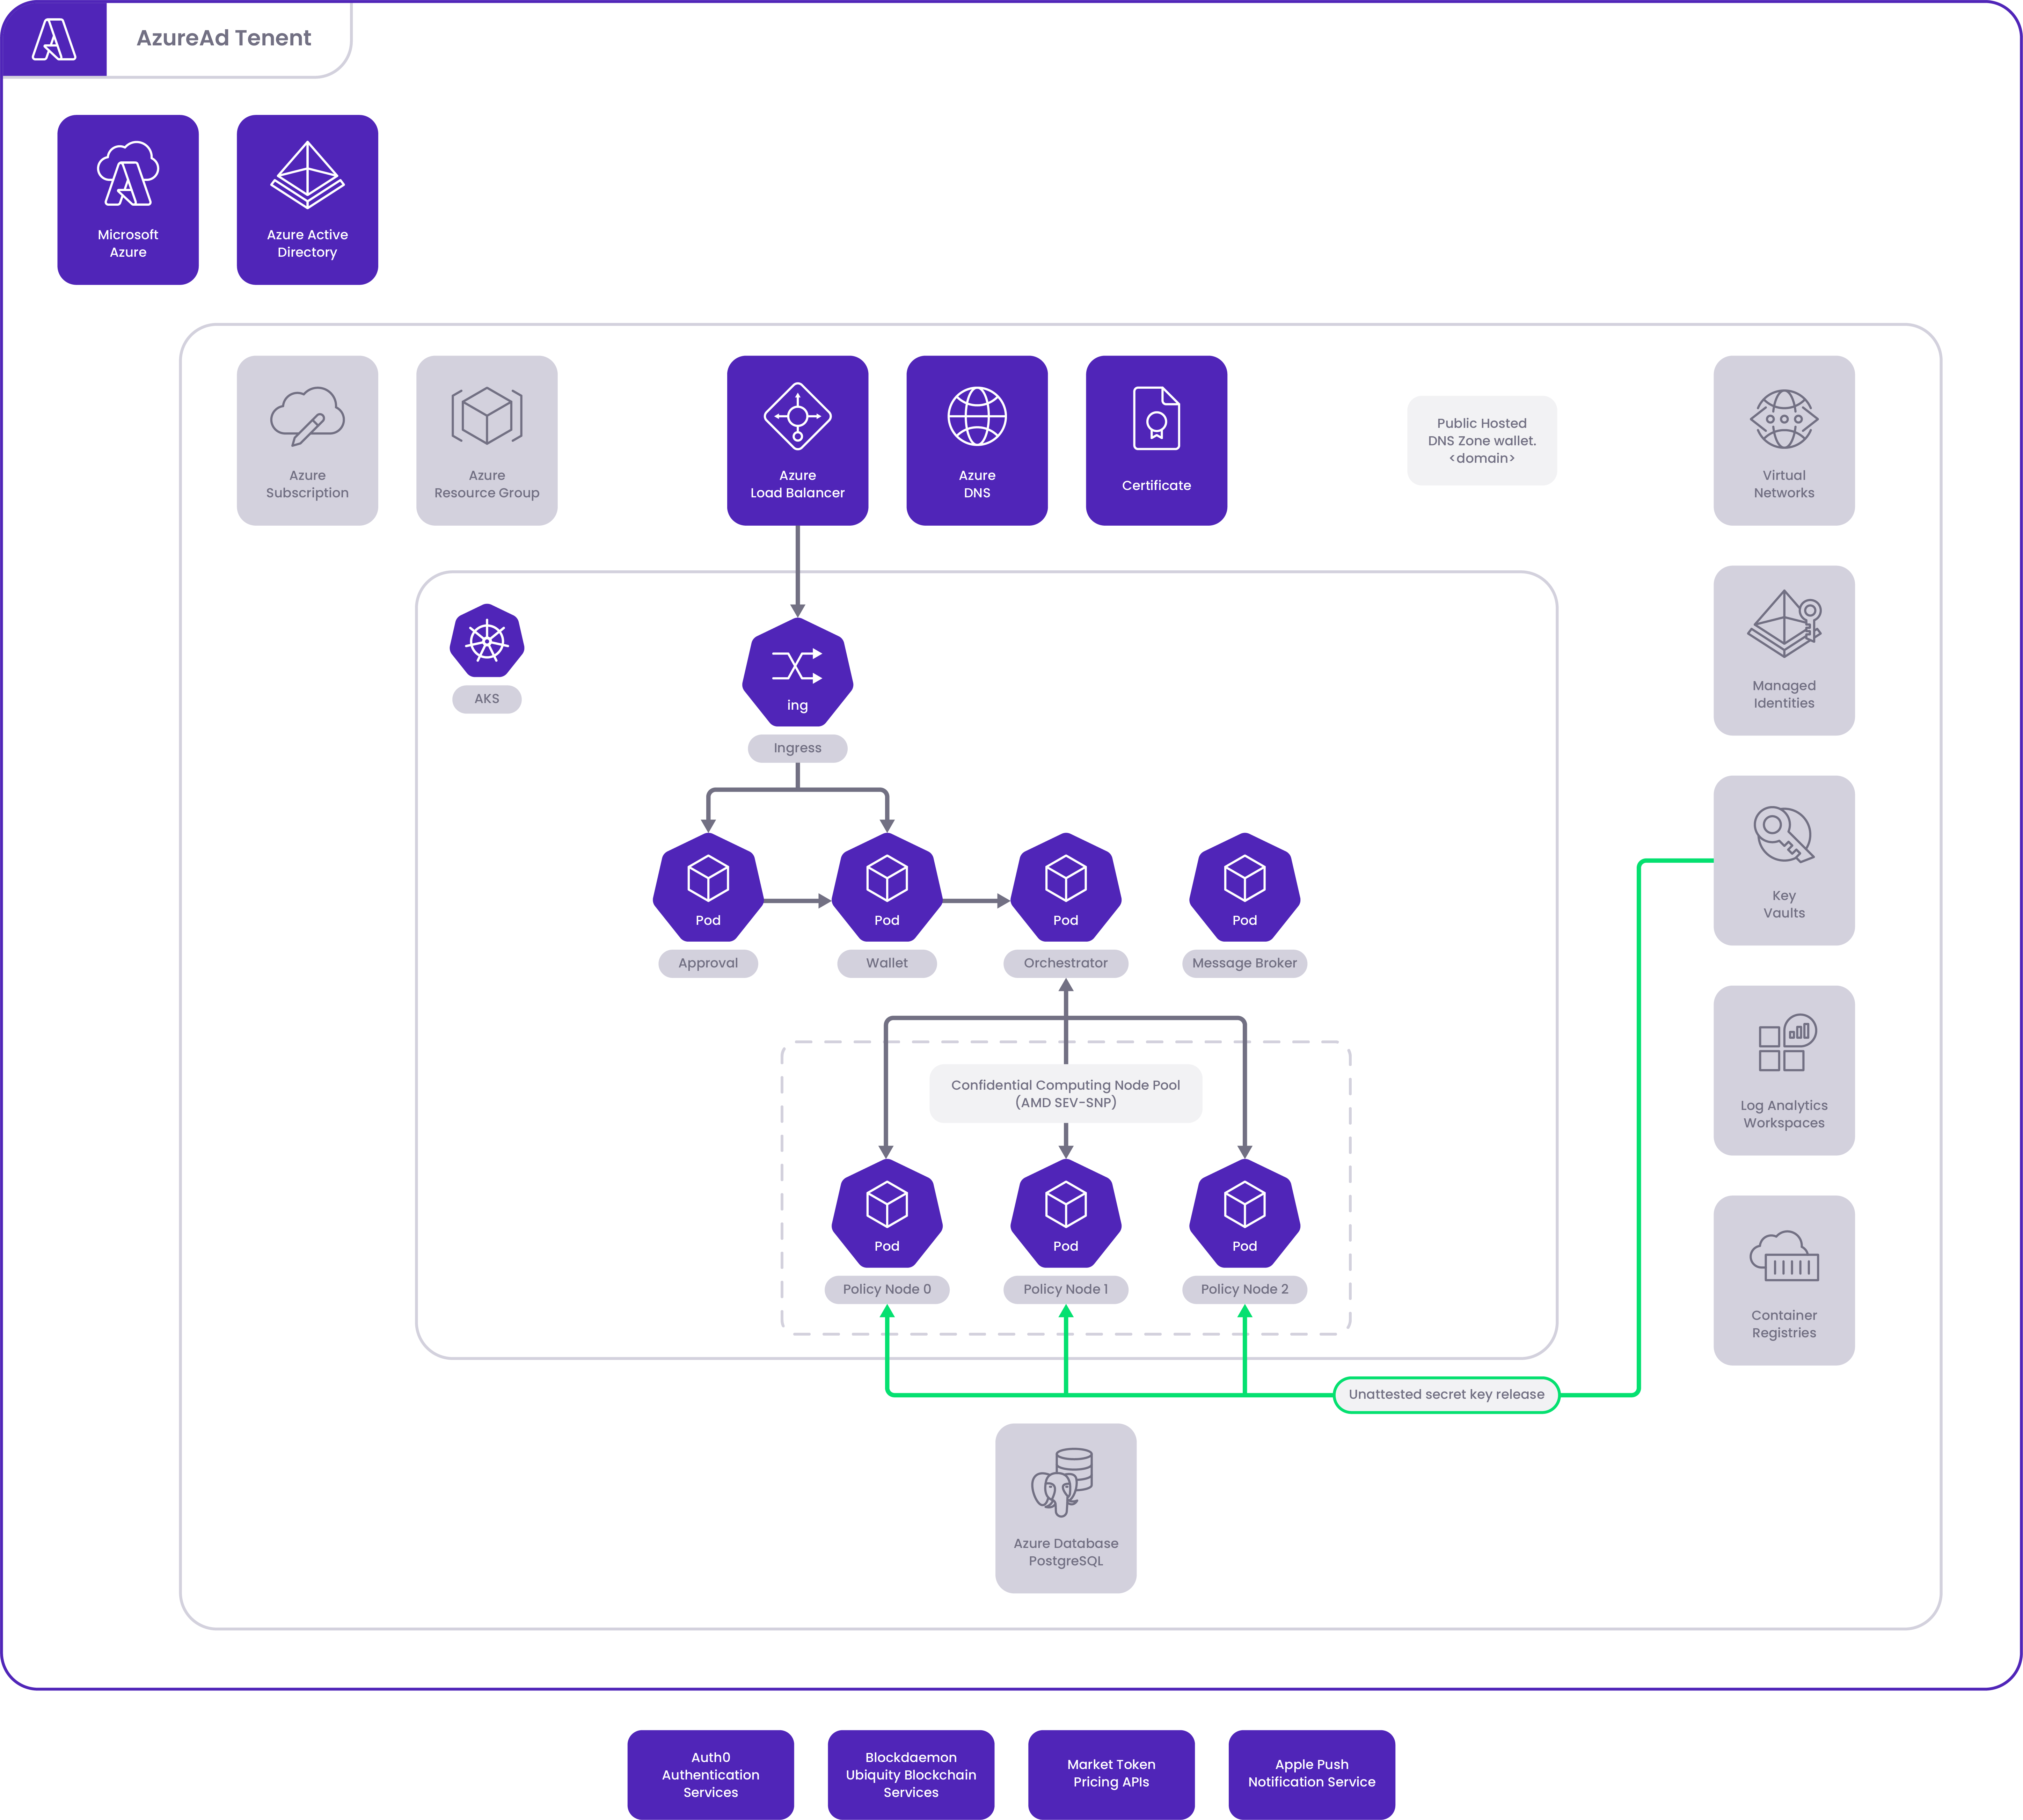
Azure Wallet Architecture
Understanding the Azure wallet architecture depicted in the image below is important before you deploy.
Step 1: Send Deployment Request Form
- To obtain the request form, Contact Us or go to this page and enter your contact details.
- Our sales team will send you a deployment request form which includes more detailed information including but not limited to:
- A new Azure subscription and Region will be used for the installation.
- A DNS zone will be used for your hosted wallet. Example: https://wallet.<companydomain.com>. The wallet installer will create networking services within this zone. Furthermore, the authentication service will call back to this domain endpoint.
- At least two administrator names and emails.
- An Okta Tenant.
- Emergency Recovery Secret (ERS) Public Key.
- To initiate the process, please complete the form and send it back to us.
Step 2: Configure Identity Provider
The wallet relies on an external Open ID Connect (OIDC) authentication service to verify user identities and provide secure access tokens to the wallet. For details about the okta installation, please refer to here.
Step 3: Delegate New Wallet DNS Zone
- Create a management resource group and DNS Zone. If you don't know how to create, please follow the steps here.
- The network administrator sets the DNS Nameserver zone delegations from the company's authoritative zone and adds them to the site in the company's registrar.
Step 4: Generate Emergency Recovery Secret
In the event of a disaster, you must restore your master wallet's private key from the backup. This backup is encrypted with the Emergency Recovery Secret (ERS) key pair. You need to generate this Emergency Recovery Secret (ERS) key pair before installing and backing up the master private key.
This ERS private key must be generated and stored securely. Follow your company policy when performing the key ceremonies.
For the mainnet or production environment, fully understand the importance of your key ceremony. We suggest starting with the following document from the Crypto Valley association.
The base64 encoded output of the public key must be supplied during the wallet application installation.
Step 5: Installation of Infrastructure and Applications
Step 5a: Prepare the Azure Cloud Shell Environment
- Navigate to your Azure portal and open the cloud shell. It is the
>_symbol near the search bar. - If multiple subscriptions exist within the tenant, ensure the desired subscription context is set within the azure prompt:
az account list
az account set --name <Subscription Name>- The installation requires more space than what is available by default within the cloud shell. Increase the cloud shell disk partition space by running the following:
SIZE_IN_GB=50
STORAGE_ACCOUNT=$(az storage account list --query '[?tags."ms-resource-usage"==`azure-cloud-shell`] | [0].name' -o tsv)
CS_SHARE=$(az storage share list --account-name $STORAGE_ACCOUNT --query '[?starts_with(name, `cs`)] | [0].name' -o tsv)
az storage share update --account-name $STORAGE_ACCOUNT -n $CS_SHARE --quota $SIZE_IN_GB- Blockdaemon generates pre-signed URLs for both the common and package bundles. Download and extract these bundles by using the commands below. This will place a Makefile in the directory of the cloud shell.
cd clouddrive
wget -O common.tar "<some url>"
tar xvf common.tar -C .
wget -O package.tar "<some url>"
tar xvf package.tar -C .- Next, to set up some paths and python updates required for the installation, run the following command:
make prep-shell
source ~/.bashrc
Step 5b: Deploy the Baseline Infrastructure
- Set the installation process for either Testnet or Mainnet blockchains by executing one of the following:
make switch-to-testnet
make switch-to-mainnet- If this is the first wallet installation within the Azure subscription, execute the following command to create an Azure storage account that will store the Terraform state for Mainnet and Testnet deployments. Note, if this has already been run for a previous installation, skip this step.
make deploy-state-storage- Next, proceed to deploy the bootstrap stack by executing the command below. This will permit the source IP to create KeyVault secrets. Alternatively, add the source IP CIDR to
key_vault_allowed_ipsin the tfvars file.
export CLOUD_SHELL_IP=$(curl -s ipinfo.io/ip)
export TF_VAR_key_vault_allowed_ips="[\"${CLOUD_SHELL_IP}/32\"]"
make deploy-bootstrap- Once the container registry is created above, push the Wallet software container images to it:
make push-imagesStep 5c: Populate Secrets
- Fill in the secrets file
customer-secrets.ymlwith your Blockdaemon Workspace name, Blockdaemon API key, and okta values. Include the rates service access key and your ERS public key from the process outlined above. - Execute the following command to create the Azure Key Wallet secrets from the updated yml file:
make populate-secretsStep 5d: Deploy Wallet and MPA Node Applications
- Finally deploy and start the wallet application by running the following command:
make deploy-walletStep 6: Backup the Wallet's Master Private Key
Upon first logging in and pairing your account with the Institutional Vault Approver App, approve backing up the wallet’s master private key from the Approver App. Ensure this backup is stored separately from the wallet system for use in recovery during a disaster.
Note:Refer to the backup and process here: Back Up Master Key.
🗣️We Are Here to Help!
Please contact us via email or support chat if you encounter an issue, bug, or need assistance. Don't forget to include any relevant details about the problem. To request a wallet form and Institutional Vault Approver form, please click here or contact our sales team.
Updated about 1 month ago