Stake ETH via Fireblocks (API)
Step 1. Onboarding the Staking API
To begin onboarding the Staking API with Blockdaemon, set up the staking configuration:
- Provide Blockdaemon with the following information:
- Network: Mainnet
- MEV: (Miner Extracted Value) enabled or disabled.
- Geolocation Preference.
- Default Fee Recipient Address for Blockdaemon to set for all validators in the staking configuration (this value can be overridden when you make the stake-intent API call).
- Once you have provided this information, Blockdaemon will create a staking configuration with the above configuration. A staking configuration is a pool of validators dedicated to your organization.
- Review the staking configuration details and proceed if everything looks good.
Step 2. Create Staking API Key
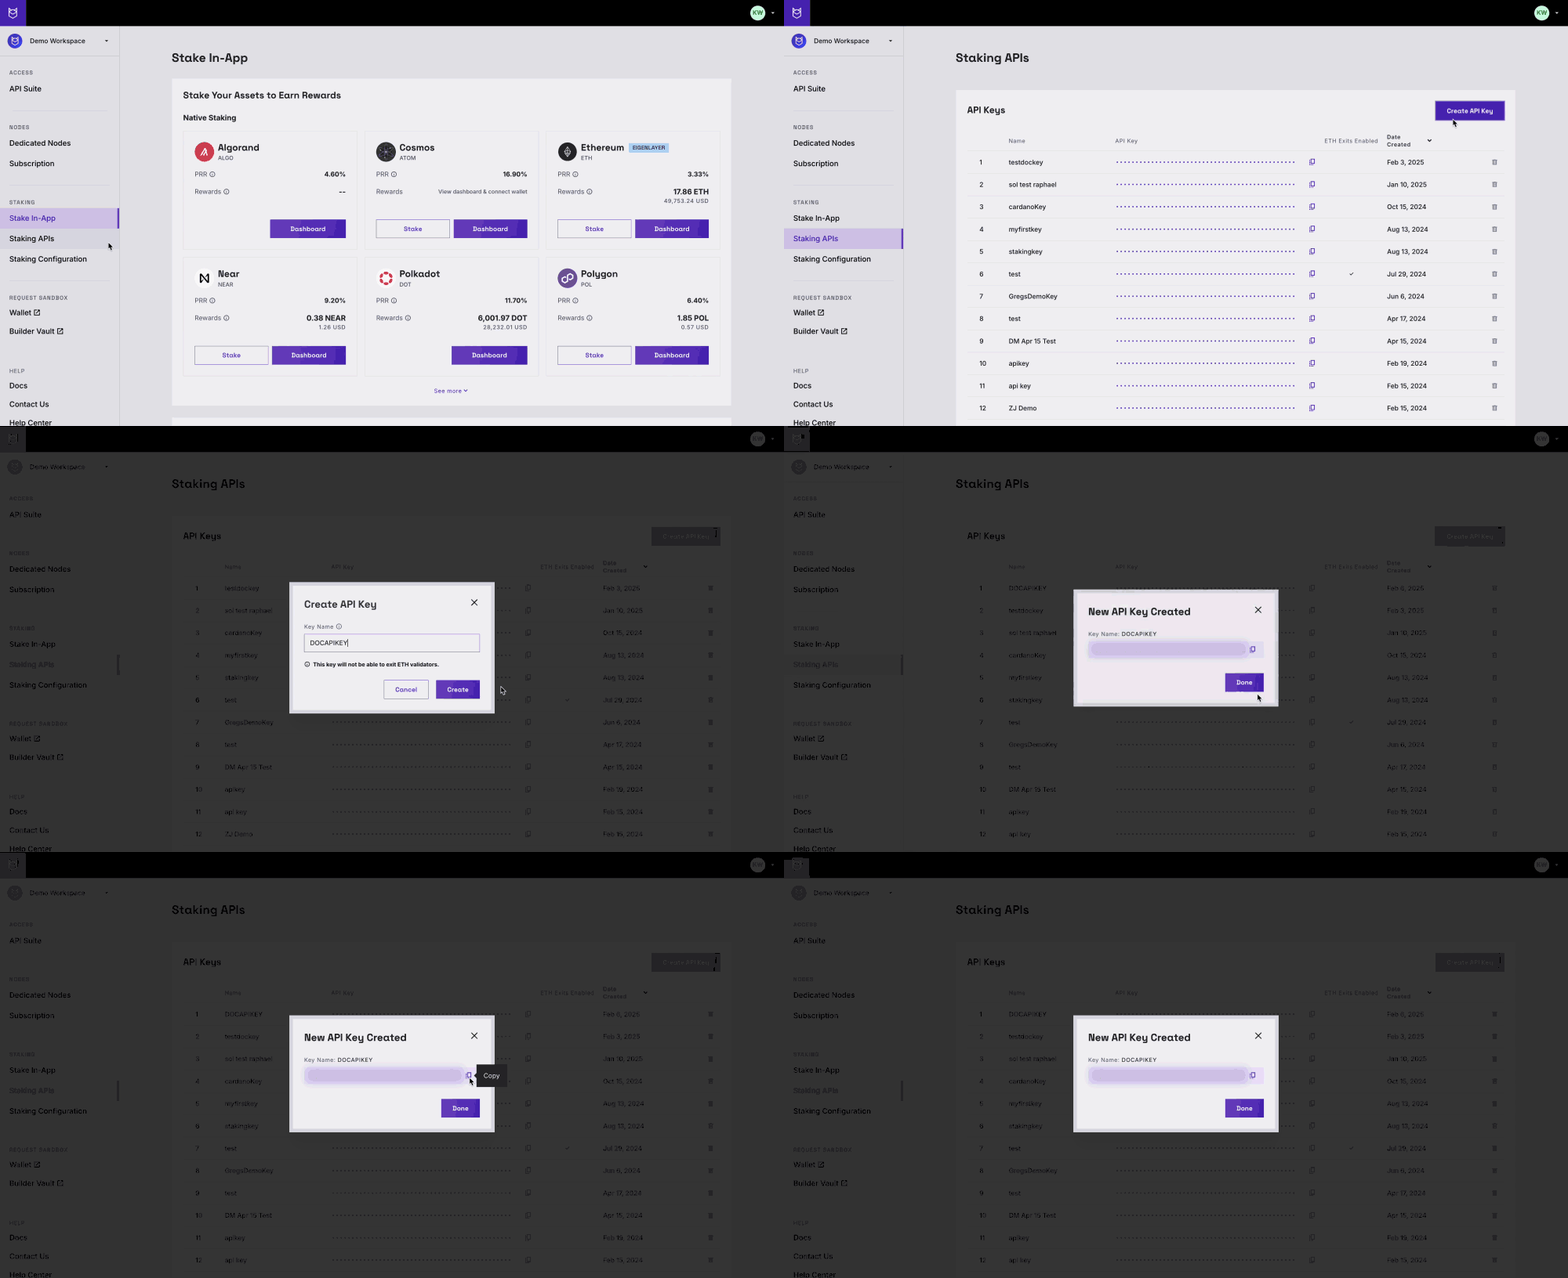
After accepting the staking configuration, log into your Blockdaemon app to create a new API key.
- Navigate to Staking APIs under the Staking section.
- Select the Create API Key button.
- Enter the name of the API key and click Create. This key will not be able to exit ETH validators.
- Copy the generated API key by clicking on the key displayed on the next pop-up. The key will start with
zpka.

Important NoteYou can find your previously created keys on the Staking APIs page. Hover over the "API Key" column next to the key name to copy, create, or delete keys.
Step 3: API Integration
-
Follow the GitHub example to set up your environment and interact with the Fireblocks SDK and Blockdaemon Staking API.
-
The GitHub example script will reserve validators by submitting the staking transaction details, such as the amount to stake, selected validators, and network information via the
[POST /stake-intents](https://docs.blockdaemon.com/reference/postethereumstakeintent)endpoint.-
Specify the required parameters:
Parameter
Description
networkSpecifies the network. Ensure that you have entered "mainnet" here.
amountSpecifies the amount of Ethereum that you wish to stake. This will show the full amount of ETH represented in Gwei with the trailing zeros.
withdrawal_addressHex-encoded Ethereum account or smart contract address. This is usually the same address as the fee recipient address defined earlier when you created your staking configuration.
quantityRefers to the number of validators that you are going to create. For instance, if depositing 32 ETH, you would select a quantity of one.
fee_recipientAn Ethereum address to receive transaction fees from published blocks. 20-bytes, hex encoded with 0x prefix, case insensitive.
In most cases, the fee recipient's address will be the same as the withdrawal address. However, you can set it up differently using the address where you funded your ETH.
plan_idThis enables you to stake to validators from the specified configuration(s).
When no
plan_idis specified, validators across all configurations that match the API route will be available for staking. Specify this object with theplan_idyou can copy from the Blockdaemon app -
The endpoint returns a raw unsigned transaction including the Blockdaemon Batch Contract Address (
contract_address). This address is necessary for configuring transaction policies in Fireblocks.See the sample response below.
{ "stake_intent_id": "stake_intent_Wgx98Rbi8nQuL9ddn3mTk1", "customer_id": "SatoshiNakamoto-xUYJbPw9hw", "plan_id": "plan_Wgx98Rbi8nQuL9ddn3mTk1", "protocol": "ethereum", "network": "mainnet", "ethereum": { "stakes": [ { "stake_id": "stake_Wgx98Rbi8nQuL9ddn3mTk1", "amount": "32000000000", "validator_public_key": "0xa1d1ad0714035353258038e964ae9675dc0252ee22cea896825c01458e1807bfad2f9969338798548d9858a571f7425c", "withdrawal_credentials": "0x0092c20062cee70389f1cb4fa566a2be5e2319ff43965db26dbaa3ce90b9df99", "fee_recipient": "0x93247f2209abcacf57b75a51dafae777f9dd38bc" } ], "contract_address": "0x00000000219ab540356cBB839Cbe05303d7705Fa", "unsigned_transaction": "0x22895118000000000000000000000000000000000000000000000000000000000000008000000000000000000000000000000000000000000000000000000000000000e00000000000000000000000000000000000000000000000000000000000000120087fed394b43849eebef1e88873cd9efdbe33136656e5148e659b8b2f33625d40000000000000000000000000000000000000000000000000000000000000030b81748644e23c4d950f9dd709f3eb73d5eacd9657997e1d9dde7c4ebd8a6519ecb9d0a7fb603d3b68e023278f9650122000000000000000000000000000000000000000000000000000000000000000000000000000000000000000000000020010000000000000000000000c509bb854c526af4cee5e037089f7aa8e091d8870000000000000000000000000000000000000000000000000000000000000060b36b79b4b206c0310472c117fa40c05342b5dc3e89f98f42c9da3ce6450d4c603cad55248017fd4eca3ab277cca64569193e4d487f5b2ea78a2bcdc81926c313c05842a3af318967a775783bba22519e8b8886587efa99aa7dab5784f792b187\n", "estimated_gas": 1001, "expiration_time": 1689939023 } } -
Step 4: Signing and Broadcasting the Transaction
The GitHub example script signs the transaction using your Fireblocks API key and broadcasts it via the Fireblocks Web3 Provider using the Fireblocks SDK.
RememberThere is a default two-hour timeout after the transaction is created for signing in Fireblocks.
👋 Need Help?
Contact us through email or our support page for any issues, bugs, or assistance you may need.
Updated about 1 month ago
