How to Deposit in Vaults
Lending and borrowing protocols let you deposit assets as collateral to earn interest, and borrow other assets against that collateral. This guide walks you through the entire flow — from fetching pool information and checking allowances, to depositing, signing, and verifying transactions.
Before You Begin: Dedicated Vaults
This guide assumes you're working with dedicated vaults — custom vaults built to support specific product requirements such as isolated strategies, protocol-specific behavior, or institutional use cases.
To interact with dedicated vaults, include the following parameter in your requests:
| Parameter | Value | Used In |
|---|---|---|
useCustomVaults | true | Pool queries, position queries, deposit, and withdrawal requests |
This flag ensures all data and interactions are routed to your dedicated vaults instead of shared or default ones.
Need a Dedicated Vault?If you'd like to set up a dedicated vault for your product or strategy, reach out to our team. We'll work with you to define the vault configuration, supported protocols, and any custom parameters for your use case.
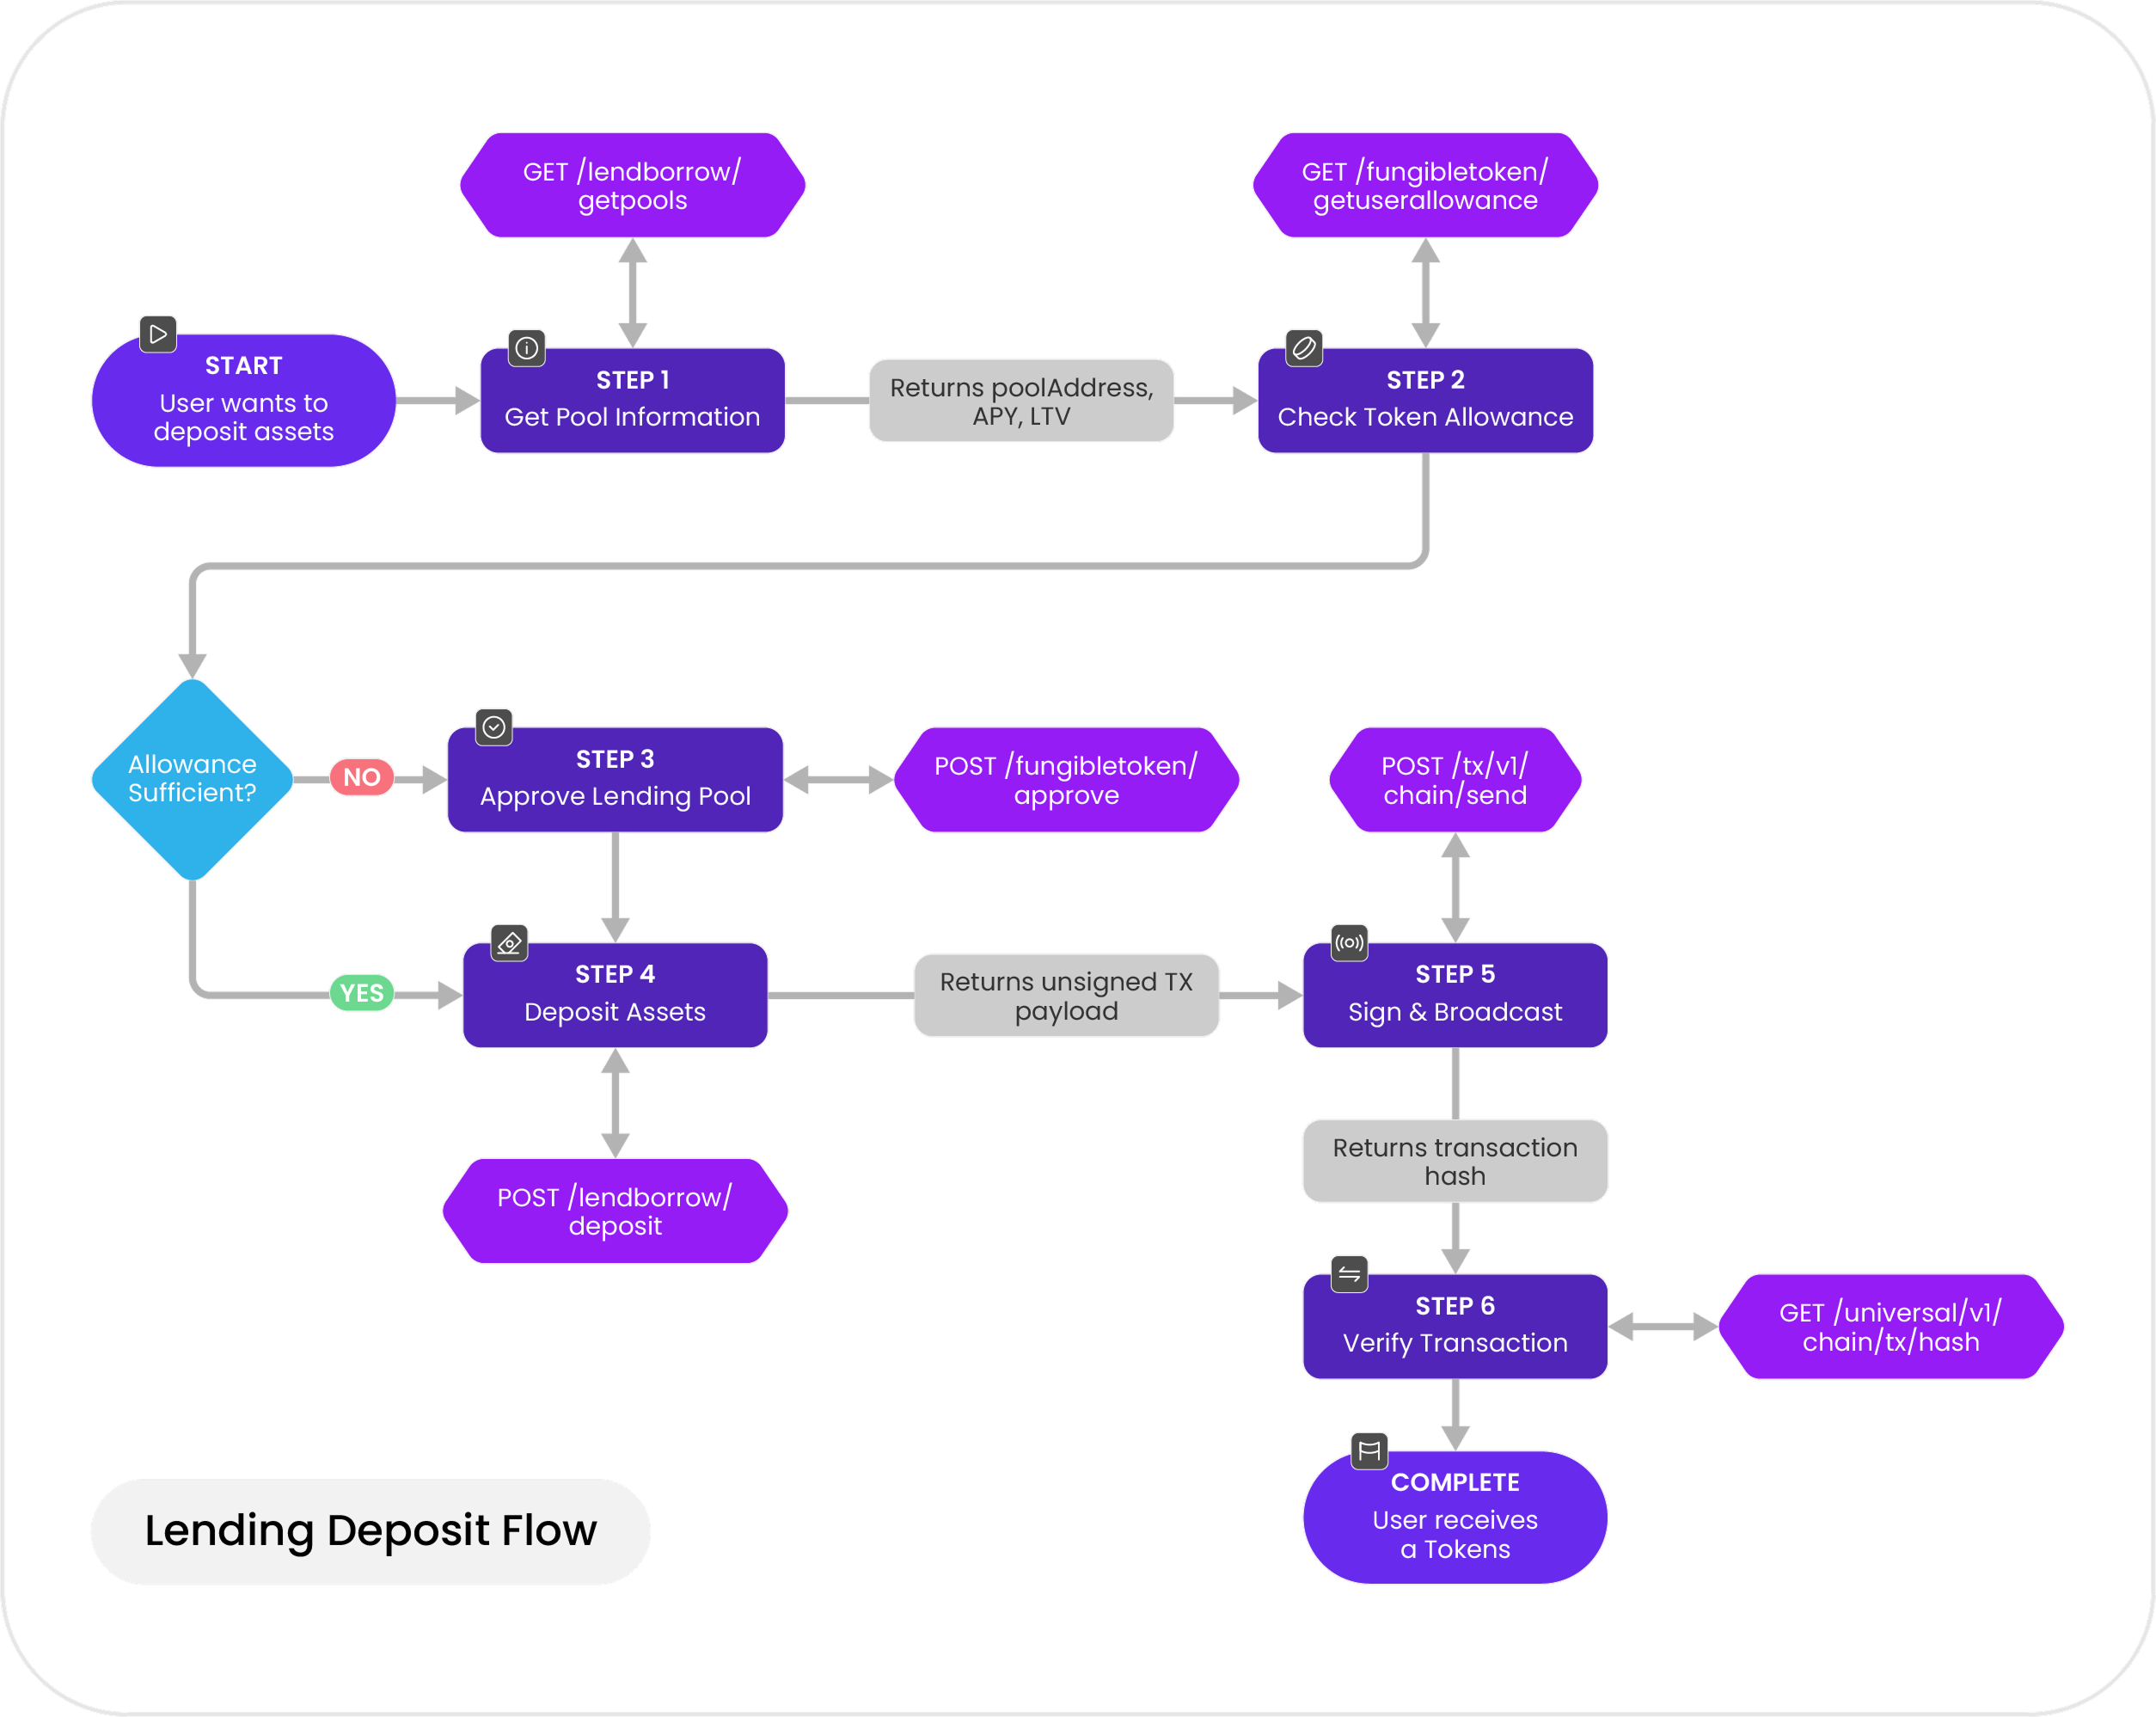
Flow Overview
Here's a high-level look at the lending deposit flow:
| Step | Operation | Description |
|---|---|---|
| 1 | Get Pool Information | Retrieve the pool address, interest rates, and liquidity for your asset |
| 2 | Check Token Allowance | Verify the lending pool has permission to access your tokens |
| 3 | Approve the Lending Pool | Grant the pool contract permission to spend your tokens |
| 4 | Deposit Assets | Supply assets to start earning interest |
| 5 | Sign & Broadcast | Sign the transaction and submit it to the blockchain |
| 6 | Verify Transaction | Confirm the transaction executed successfully |
| 7 | Get User Positions | Check your lending positions, balances, and rewards |
Step 1: Get Pool Information
Start by retrieving pool information for the asset you want to deposit. This response gives you the pool address (which you'll need in Steps 2 and 3), along with current interest rates, the loan-to-value ratio, and available liquidity.
Endpoint
GET https://svc.blockdaemon.com/defi/v1/lendborrow/getpoolsParameters
| Parameter | Required | Description |
|---|---|---|
lendborrowId | Yes | Identifier for the lending protocol (e.g., 1200 for Aave V3 on Ethereum Mainnet) |
assets | Yes | Token symbol (e.g., USDC) or ERC-20 contract address to query |
useCustomVaults | Yes | Set to true to fetch data from your dedicated vaults |
Example Request
curl --location \
  'https://svc.blockdaemon.com/defi/v1/lendborrow/getpools?lendborrowId=1200&assets=USDC&useCustomVaults=true' \
  --header 'Content-Type: application/json' \
  --header 'Authorization: Bearer YOUR_API_KEY'
Example Response
{
  "status": 200,
  "msg": "success",
  "data": {
    "USDC": {
      "tokenSymbol": "USDC",
      "tokenAddress": "0xa0b86991c6218b36c1d19d4a2e9eb0ce3606eb48",
      "logoUrl": "https://images.ctfassets.net/hwqnbx905qdp/153HkqSJWC5wZw7YNCZbQc/c7222120de244ea254c9bc4bdef76fae/eip155_1-0xA0b86991c6218b36c1d19D4a2e9Eb0cE3606eB48.webp",
      "tags": ["stablecoin"],
      "poolAddress": "0x7C15E25AD5a219030A2F748fbd68eeEa36191e29",
      "variableBorrowRate": "4.95",
      "estimatedVariableBorrowAPY": "5.08",
      "stableSupplyRate": "0.00",
      "variableSupplyRate": "3.66",
      "estimatedSupplyAPY": "3.72",
      "ltv": "75",
      "availableLiquidity": "398699845269846",
      "reserveSize": "4508504190717153",
      "prices": {
        "usd": [
          {
            "0xa0b86991c6218b36c1d19d4a2e9eb0ce3606eb48": "0.9999232435582142"
          }
        ]
      }
    }
  }
}
ImportantSave the
poolAddressfrom this response. You'll use it as thespenderparameter in Step 2 and thetoparameter in Step 3.
Step 2: Check Token Allowance
Before depositing, verify that the lending pool contract has enough allowance to access your tokens. This check uses the poolAddress from Step 1 as the spender.
Endpoint
GET https://svc.blockdaemon.com/defi/v1/fungibletoken/getuserallowanceParameters
| Parameter | Required | Description |
|---|---|---|
owner | Yes | The wallet address that owns the tokens |
tokenAddress | Yes | The ERC-20 token contract address to check |
spender | Yes | The lending pool contract address (poolAddress from Step 1) |
Example Request
curl --location \
  'https://svc.blockdaemon.com/defi/v1/fungibletoken/getuserallowance?owner=0x6Fb447Ae94F5180254D436A693907a1f57696900&tokenAddress=0xa0b86991c6218b36c1d19d4a2e9eb0ce3606eb48&spender=0x7C15E25AD5a219030A2F748fbd68eeEa36191e29' \
  --header 'Content-Type: application/json' \
  --header 'Authorization: Bearer YOUR_API_KEY'
Example Response
{
  "status": 200,
  "msg": "success",
  "data": {
    "allowance": "1000000000000000000",
    "prices": {
      "usd": [
        {
          "0xa0b86991c6218b36c1d19d4a2e9eb0ce3606eb48": "0.9999173038291085"
        }
      ]
    }
  }
}
What Next?
- If the
allowancevalue is less than the amount you want to deposit → proceed to Step 3 to approve the pool.- If the
allowanceis sufficient → skip ahead to Step 4 and deposit directly.
Step 3: Approve the Lending Pool
If the current allowance is insufficient, you need to approve the lending pool contract to spend your tokens. This generates an unsigned transaction that, once signed and broadcast, grants the pool permission to transfer tokens on your behalf.
This is typically a one-time transaction per token, unless you need to increase the allowance later.
Endpoint
POST https://svc.blockdaemon.com/defi/v1/fungibletoken/approveParameters
| Parameter | Required | Description |
|---|---|---|
from | Yes | The wallet address initiating the approval |
tokenAddress | Yes | The ERC-20 token contract address to approve |
amount | Yes | Amount to approve, in the token's smallest unit. Use a large value for unlimited approval |
to | Yes | The lending pool contract address (poolAddress from Step 1) |
chainId | Yes | The blockchain network ID (e.g., 1 for Ethereum Mainnet, 8453 for Base) |
Example Request
curl --location \
  'https://svc.blockdaemon.com/defi/v1/fungibletoken/approve' \
  --header 'Content-Type: application/json' \
  --header 'Authorization: Bearer YOUR_API_KEY' \
  --data '{
    "from": "0x6Fb447Ae94F5180254D436A693907a1f57696900",
    "tokenAddress": "0xa0b86991c6218b36c1d19d4a2e9eb0ce3606eb48",
    "amount": "1000000",
    "to": "0x7C15E25AD5a219030A2F748fbd68eeEa36191e29",
    "chainId": "1"
  }'
Example Response
{
  "status": 200,
  "msg": "success",
  "data": {
    "chainId": "1",
    "from": "0x6Fb447Ae94F5180254D436A693907a1f57696900",
    "to": "0xa0b86991c6218b36c1d19d4a2e9eb0ce3606eb48",
    "gas": "56361",
    "value": "0",
    "data": "0x095ea7b30000000000000000000000007c15e25ad5a219030a2f748fbd68eeea36191e2900000000000000000000000000000000000000000000000000000000000f4240",
    "estimationCheck": true,
    "referenceId": "1599881a6bb445a192c3b028bcd65243"
  }
}
Security TipConsider approving only the exact amount you need rather than granting unlimited approval. This minimizes exposure if a contract is compromised. You can always approve additional amounts later.
Step 4: Deposit Assets
With sufficient allowance in place, you can now deposit tokens into the lending pool. Upon deposit, you'll receive vault share tokens that represent your position.
Endpoint
POST https://svc.blockdaemon.com/defi/v1/lendborrow/depositParameters
| Parameter | Required | Description |
|---|---|---|
lendborrowId | Yes | Identifier for the lending protocol (e.g., 1200 for Aave V3 on Ethereum, 1206 for Aave V3 on Base) |
asset | Yes | The token contract address to deposit |
amount | Yes | Amount to deposit, in the token's smallest unit (e.g., 1000000 = 1 USDC, since USDC has 6 decimals) |
from | Yes | The wallet address initiating the deposit |
onBehalfOf | Yes | The address that will receive the vault share tokens (usually the same as from) |
useCustomVaults | Yes | Set to true to route the deposit to your dedicated vault |
Example Request
curl --location \
  'https://svc.blockdaemon.com/defi/v1/lendborrow/deposit' \
  --header 'Content-Type: application/json' \
  --header 'Authorization: Bearer YOUR_API_KEY' \
  --data '{
    "lendborrowId": "1200",
    "asset": "0xa0b86991c6218b36c1d19d4a2e9eb0ce3606eb48",
    "amount": "1000000",
    "from": "0x6Fb447Ae94F5180254D436A693907a1f57696900",
    "onBehalfOf": "0x6Fb447Ae94F5180254D436A693907a1f57696900",
    "useCustomVaults": true
  }'
Example Response
{
  "status": 200,
  "msg": "success",
  "data": {
    "chainId": "1",
    "from": "0x6Fb447Ae94F5180254D436A693907a1f57696900",
    "to": "0x7C15E25AD5a219030A2F748fbd68eeEa36191e29",
    "gas": "500000",
    "value": "0",
    "data": "0x6e553f6500000000000000000000000000000000000000000000000000000000000f42400000000000000000000000006fb447ae94f5180254d436a693907a1f57696900",
    "estimationCheck": true,
    "referenceId": "d0b8ebab4b544d1b9182c1ea94baf017"
  }
}
How Interest WorksAfter depositing, your vault share token balance stays constant, but the value of each share increases over time as interest accrues from Aave. This means your position grows in value without the token count changing.
Step 5: Sign & Broadcast the Transaction
The deposit endpoint returns an unsigned transaction payload. You need to sign it with your private key and then broadcast it to the blockchain.
Signing the Transaction
- Retrieve the transaction object from the deposit response (Step 4).
- Sign the transaction using your preferred wallet or signing infrastructure (e.g., MetaMask, WalletConnect, or a backend signer).
- Make sure the
fromaddress matches the wallet performing the signature. - The output will be a
rawTransaction— a hex-encoded signed transaction string.
- Make sure the
- Verify the signed transaction includes the correct
nonce,gas, andtofields before broadcasting.
Broadcasting the Transaction
Once signed, submit the transaction to the network.
Endpoint
POST https://svc.blockdaemon.com/tx/v1/{blockchain_id}/sendParameters
| Parameter | Required | Description |
|---|---|---|
blockchain_id | Yes | A hyphen-separated protocol-network pair (e.g., ethereum-mainnet, base-mainnet) |
tx | Yes | The signed transaction in hexadecimal format |
Example Request
curl --request POST \
  --url https://svc.blockdaemon.com/tx/v1/ethereum-mainnet/send \
  --header 'Authorization: Bearer YOUR_API_KEY' \
  --header 'Content-Type: application/json' \
  --data '{
    "tx": "0xf8ad82006c8504a817c80083063cba94a238dd80c259a72e81d7e4664a9801593f98d1c580b844e8eda9df000000000000000000000000833589fcd6edb6e08f4c7c32d4f71b54bda029130000000000000000000000000000000000000000000000000000000000f424000000000000000000000000006fb447ae94f5180254d436a693907a1f5769690025a0..."
  }'
Example Response
{
  "id": "0x2aed3cd0901952a0b3d95e7ece2ff4d0671e5b8162261fcd42fee66e72ea4bd5"
}
The id field is your transaction hash. You'll use it in the next step to track and verify the transaction.
Step 6: Verify the Transaction
After broadcasting, check the transaction status to confirm it executed successfully.
Endpoint
GET https://svc.blockdaemon.com/universal/v1/{protocol}/{network}/tx/{hash}Parameters
| Parameter | Required | Description |
|---|---|---|
protocol | Yes | The blockchain protocol (e.g., ethereum, base) |
network | Yes | The network name (e.g., mainnet) |
hash | Yes | The transaction hash from Step 5 |
Example Request
curl --location \
  'https://svc.blockdaemon.com/universal/v1/ethereum/mainnet/tx/0x2aed3cd0901952a0b3d95e7ece2ff4d0671e5b8162261fcd42fee66e72ea4bd5' \
  --header 'Authorization: Bearer YOUR_API_KEY' \
  --header 'Accept: application/json'
Example Response
{
  "id": "0x2aed3cd0901952a0b3d95e7ece2ff4d0671e5b8162261fcd42fee66e72ea4bd5",
  "status": "completed",
  "block_number": 24227052,
  "timestamp": 1768322615,
  "from": "0x6Fb447Ae94F5180254D436A693907a1f57696900",
  "to": "0xA238Dd80C259a72e81d7e4664a9801593F98d1c5",
  "events": [
    {
      "type": "fee",
      "asset": "ETH",
      "amount": "0.00019594"
    },
    {
      "type": "transfer",
      "asset": "USDC",
      "amount": "1.00",
      "from": "0x6Fb447Ae94F5180254D436A693907a1f57696900",
      "to": "0xA238Dd80C259a72e81d7e4664a9801593F98d1c5"
    }
  ]
}
A "status": "completed" confirms your deposit was successful. The events array shows the token transfer and any fees paid.
Step 7: Get User Positions
Finally, retrieve your lending positions to confirm the deposit and view your current balances, accrued rewards, and APY.
Endpoint
GET https://svc.blockdaemon.com/defi/v1/lendborrow/getuserpositionsParameters
| Parameter | Required | Description |
|---|---|---|
useCustomVaults | Yes | Set to true to query positions in your dedicated vaults |
lendborrowId | Yes | Identifier for the lending protocol (e.g., 1200 for Aave V3 on Ethereum) |
address | Yes | The wallet address to query positions for |
Example Request
curl --location \
  'https://svc.blockdaemon.com/defi/v1/lendborrow/getuserpositions?useCustomVaults=true&lendborrowId=1200&address=0x50cff7e5c7d76a1e8a089625178614c0de63cbe8' \
  --header 'Authorization: Bearer YOUR_API_KEY'
Example Response
{
  "status": 200,
  "msg": "success",
  "data": [
    {
      "underlyingAsset": "0x853d955aCEf822Db058eb8505911ED77F175b99e",
      "scaledATokenBalance": "4745866419141874213",
      "usageAsCollateralEnabledOnUser": false,
      "aToken": "0xd4e245848d6E1220DBE62e155d89fa327E43CB06",
      "currentBalance": "5622165768846743216",
      "rewardsAPYPercentage": "3.94",
      "accruedRewards": "876299349704869003",
      "estimatedSupplyAPY": "4.01",
      "prices": {
        "usd": [
          {
            "0x853d955acef822db058eb8505911ed77f175b99e": "0.9925565390932398"
          }
        ]
      }
    }
  ]
}
TipUse this endpoint to monitor your positions over time. The
currentBalancewill grow as interest accrues, andaccruedRewardstracks any additional protocol incentives you've earned.
Additional Operations
Beyond depositing, the lending protocol supports withdrawing.
Withdraw
Retrieve your deposited collateral — either partially or in full. To withdraw, you return the vault share tokens you received during deposit.
Endpoint
POST https://svc.blockdaemon.com/defi/v1/lendborrow/withdraw
Api ReferenceSee the API Reference for the full request/response schema.
For this operation, follow the same Sign & Broadcast (Step 5) and Verify Transaction (Step 6) process described earlier in this guide.
👋 Need Help?
Interested in a B2B2C setup, true-ups, or revenue-share arrangements? We'd love to chat about how dedicated vaults can work for your business.
For any issues, bugs, or questions, reach out to us via email or our support page.
Updated 4 months ago