---
updatedAt: 2026-05-13T08:38:11.000Z
---

Fetch the complete documentation index at: https://docs.blockdaemon.com/llms.txt. Use this file to discover all available pages before exploring further. Append .md to any documentation page URL to get its markdown version.

# How to Stake

This guide walks you through staking ETH with Blockdaemon's validators using the [Blockdaemon app](https://app.blockdaemon.com/signin/).

> ❗️ Note
>
> When staking Ethereum on Blockdaemon, you can use smart contracts to enable batch deposits and reduce gas costs. This smart contract has been externally audited and is deployed on the follow networks.
>
> Please ensure that you are **only** interacting with the below contracts when you stake:
>
> <HTMLBlock>{`
> <table>
>   <thead>
>     <tr>
>       <th>Network</th>
>       <th>Contract Type</th>
>       <th>Address</th>
> 		</tr>
>   </thead>
>   <tbody>
>     <tr>	
>       <td rowSpan=2>Ethereum Mainnet</td>
>       <td>Pectra</td>
> 			<td><code>0xDc8D2A1d8cd79e1542441743e448129a00A59aE0</code></td>
>     </tr>
>     <tr>
>       <td>Pre-Pectra</td>
> 			<td><code>0x3F124C700fb5E741F128e28985267D44f56B242F</code></td>
>     </tr>
>     <tr>	
>       <td rowSpan=1>Ethereum Hoodi</td>
>       <td>Pectra</td>
> 			<td><code>0x106903a059E9DE6636b17b2E7913a7c1d85C799a</code></td>
>     </tr>
> 	</tbody>
> </table>
> `}</HTMLBlock>
>
> Please note that on Mainnet, Pectra contracts are used for 0x02 validators and Pre-Pectra contracts are used for 0x01 validators, while on Hoodi, the Pectra contract is used for both validator types.

## Step 1. Onboarding the Staking Configuration

A **staking configuration** is a set of validators dedicated to your organization deployed based on the parameters set in the associated configuration. It's created on your behalf initially once [KYB](https://docs.blockdaemon.com/docs/business-verification-kyb) has been performed.

1. Provide the following information to your Customer Success Manager:
   1. **Network**: Mainnet or Hoodi testnet.
   2. **MEV**: (Maximal Extractable Value) enabled or disabled.
   3. **Geolocation Preference**.
   4. **Default Fee Recipient Address** for Blockdaemon to set for all validators in the staking configuration (this value can be overridden at [stake](https://docs.blockdaemon.com/docs/how-to-stake-copy#step-4-stake-eth) time).
2. Once you have provided this information, Blockdaemon will create a **staking configuration** with the above configuration.

## Step 2: Access Staking Page

1. Go to **Wallets & Staking** > **Staking** menu.
2. Staking can be initiated from the Ethereum card as shown below via the **Stake** button and is also available from the **Dashboard**.

   <Image align="center" border={false} width="740px" src="https://files.readme.io/cdcb7b5dbd08ff7337543f1bc7775ce1df80beb96d215c27f1fb23bed18133f9-ethereum_stake_page.png" />

   If you begin staking ETH from the Ethereum Dashboard, select **Stake**.

   <Image align="center" border={false} width="740px" src="https://files.readme.io/03f850bfc7645569740ef2f7604886342c65e01be0ebd5d0b04e6f9b0b756145-Screenshot_2025-04-14_at_11.50.02.png" />

## Step 3: Connect Your Wallet

1. Connect your wallet based on the staking configuration.

   * **If you have more than 1 Ethereum staking configuration**: Select the configuration you’d like to use, then select **Connect Wallet**.

     <Image align="center" border={false} width="740px" src="https://files.readme.io/f8445163a1c0b22b2a24727f190bd19c403fa2b239e05a9e2a0bdd419e213bc5-ScreenRecording2025-04-10at20.22.17-ezgif.com-video-to-gif-converter.gif" />

   * **If you only have 1 Ethereum staking configuration**: Select **Connect Wallet**.

     <Image align="center" border={false} width="740px" src="https://files.readme.io/34ec077d55ceb9413624958a9f7b3a23e118ec5814c5300cb548b091d4f8b316-Screenshot_2025-04-10_at_21.36.37.png" />

2. Choose your wallet from the available options to access your account and link it to the Blockdaemon app.

<Image align="center" border={false} width="740px" src="https://files.readme.io/9539ac5f6a13fe9c2a345be639101804b80940207ce31f243cd34cdacbe94149-Screenshot_2025-04-10_at_21.36.09.png" />

3. Your wallet information and details of your Staking Configuration will be displayed at the top of the page.

<Image align="center" border={false} width="740px" src="https://files.readme.io/b1446e1675b40a4eab39b52ce2f0ddbf19bdaf468a1c35cc5e26fea3f6a9c65b-Screenshot_2025-04-10_at_21.35.36.png" />

## Step 4: Stake ETH

> ❗️ Note
>
> * Ensure your account has enough balance to cover the amount to be staked plus gas fees.
> * Please ensure the fee recipient and withdrawal addresses are correct, as they cannot be changed after validators have launched.

<HTMLBlock>{`
<style>
    .callout-box {
      background-color: #f9f9f9; /* Light gray background */
      border-left: 5px solid #007bff; /* Blue left border */
      padding: 15px; /* Padding inside the box */
      margin: 20px 0; /* Margin to separate from other elements */
      font-family: Arial, sans-serif; /* Font for the content */
      color: #333; /* Text color */
    }

    .callout-box h3 {
      margin-top: 0; /* Remove top margin for h3 */
    }

    .callout-box p {
      margin-bottom: 0; /* Remove bottom margin for paragraph */
    }

    .callout-box.warning {
      background-color: #fff3cd; /* Yellow background for warning */
      border-left-color: #ffc107; /* Yellow border */
    }

    .callout-box.info {
      background-color: #d1ecf1; /* Light blue background for info */
      border-left-color: #17a2b8; /* Blue border */
    }

    .callout-box.success {
      background-color: #d4edda; /* Light green background for success */
      border-left-color: #28a745; /* Green border */
    }

    .callout-box.error {
      background-color: #f8d7da; /* Light red background for error */
      border-left-color: #dc3545; /* Red border */
    }
  
  .tab-container {
    font-family: sans-serif;
  }

  input[type="radio"] {
    display: none;
  }

  .tab-labels {
    display: flex;
    gap: 1.5rem;
    border-bottom: 1px solid #e0e0e0;
    margin-bottom: 1rem;
  }

  .tab-labels label {
    padding: 0.5rem 0;
    cursor: pointer;
    font-weight: 500;
    color: #6b7280;
    position: relative;
  }

  .tab-labels label::after {
    content: '';
    position: absolute;
    left: 0;
    bottom: -1px;
    width: 100%;
    height: 2px;
    background: transparent;
    transition: background 0.3s;
  }

  #tab1:checked ~ .tabs .label1,
  #tab2:checked ~ .tabs .label2 {
    font-weight: 700;
    color: #1f2937;
  }

  #tab1:checked ~ .tabs .label1::after,
  #tab2:checked ~ .tabs .label2::after {
    background: #1f2937;
  }

  .tab-content {
    display: none;
    color: #374151;
  }

  #tab1:checked ~ .tabs .content1,
  #tab2:checked ~ .tabs .content2 {
    display: block;
  }

  .step-image {
    margin: 1rem 0 2rem 0;
  }

  .step-sublist {
    margin-top: 0.5rem;
    margin-bottom: 1rem;
  }
</style>

<div class="tab-container">
  <input type="radio" name="tabs" id="tab1" checked>
  <input type="radio" name="tabs" id="tab2">

  <div class="tabs">
    <div class="tab-labels">
      <label class="label1" for="tab1"><b>Default Config</b></label>
      <label class="label2" for="tab2"><b>Custom Config</b></label>
    </div>

    <div class="tab-content content1">
      <ol>
        <li>Specify the staking amount using the slider.</li>
        <div class="step-image">
          <img src="https://files.readme.io/66446f7f98542668c69bf79e70e970ea0ed4d6295dd4b59e5aac0e23067dc68b-Screenshot_2025-04-14_at_13.42.51.png" width="740">
        </div>

        <li style="margin-top: 2rem;">
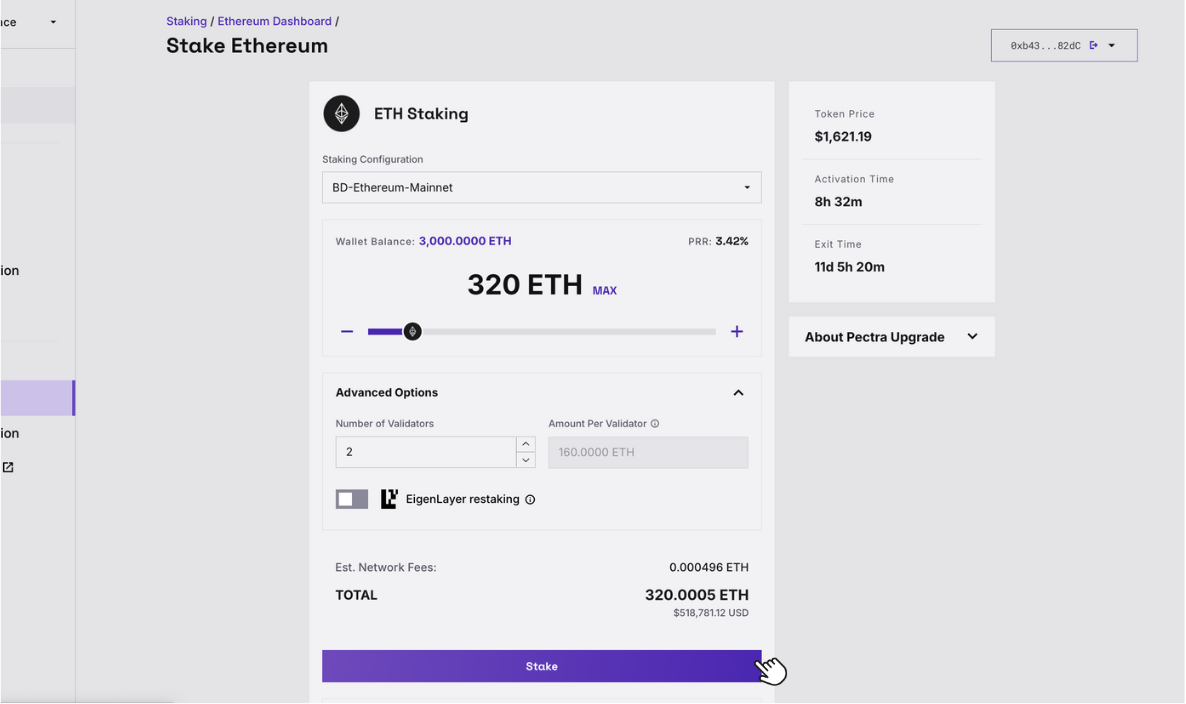
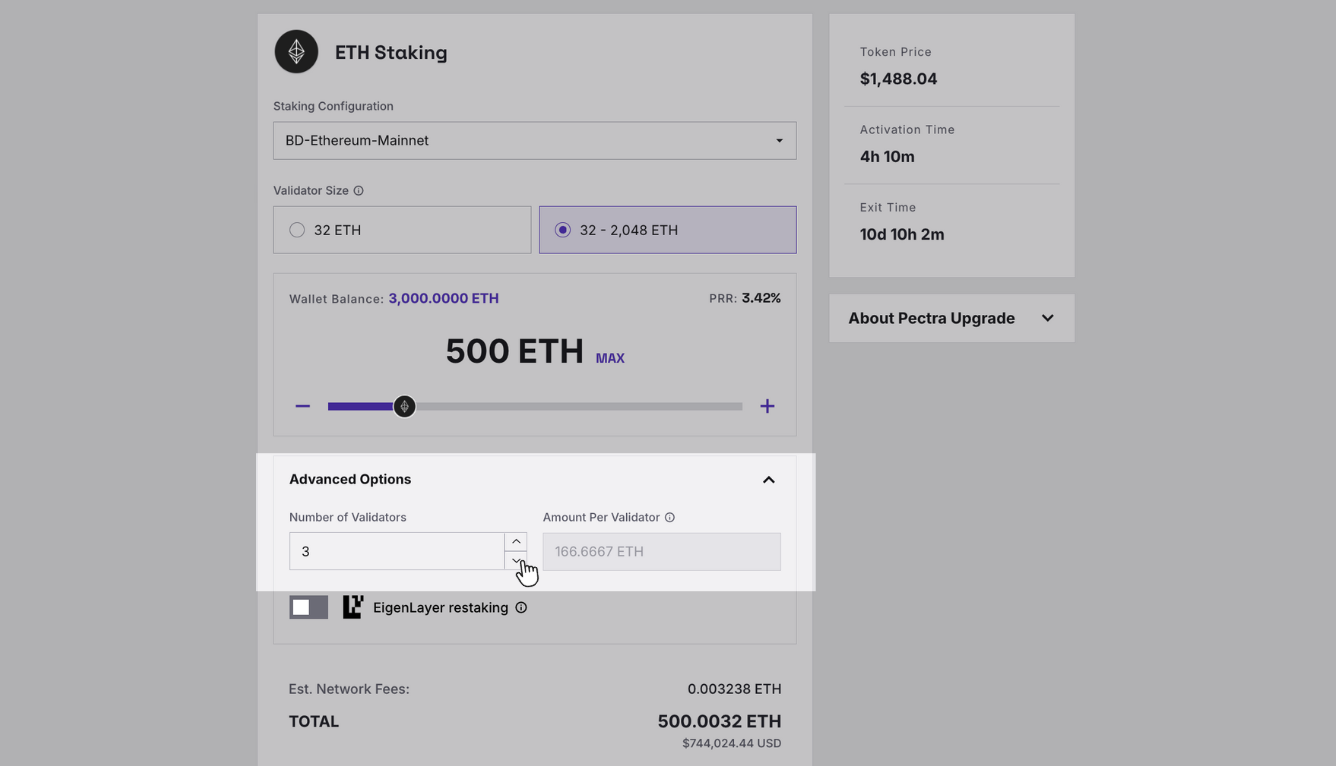
          In the <strong>Advanced Option</strong>, the number of validators is set based on the staked ETH amount. You can increase or decrease the validator count as needed.
          <blockquote style="margin-top: 1rem;">
            <strong>❗️ Blockdaemon recommends 150–500 ETH per validator to maximize compounding rewards, but any amount between 32–2,048 ETH is accepted.</strong>
          </blockquote>
          <div class="step-image" style="margin-top: 1rem;">
            <img src="https://files.readme.io/12a61419e06d220482e35a12c8bb8394828c0cb24038f152d0f330bd2a606793-Screenshot_2025-04-14_at_13.41.28.png" width="740">
          </div>
        </li>

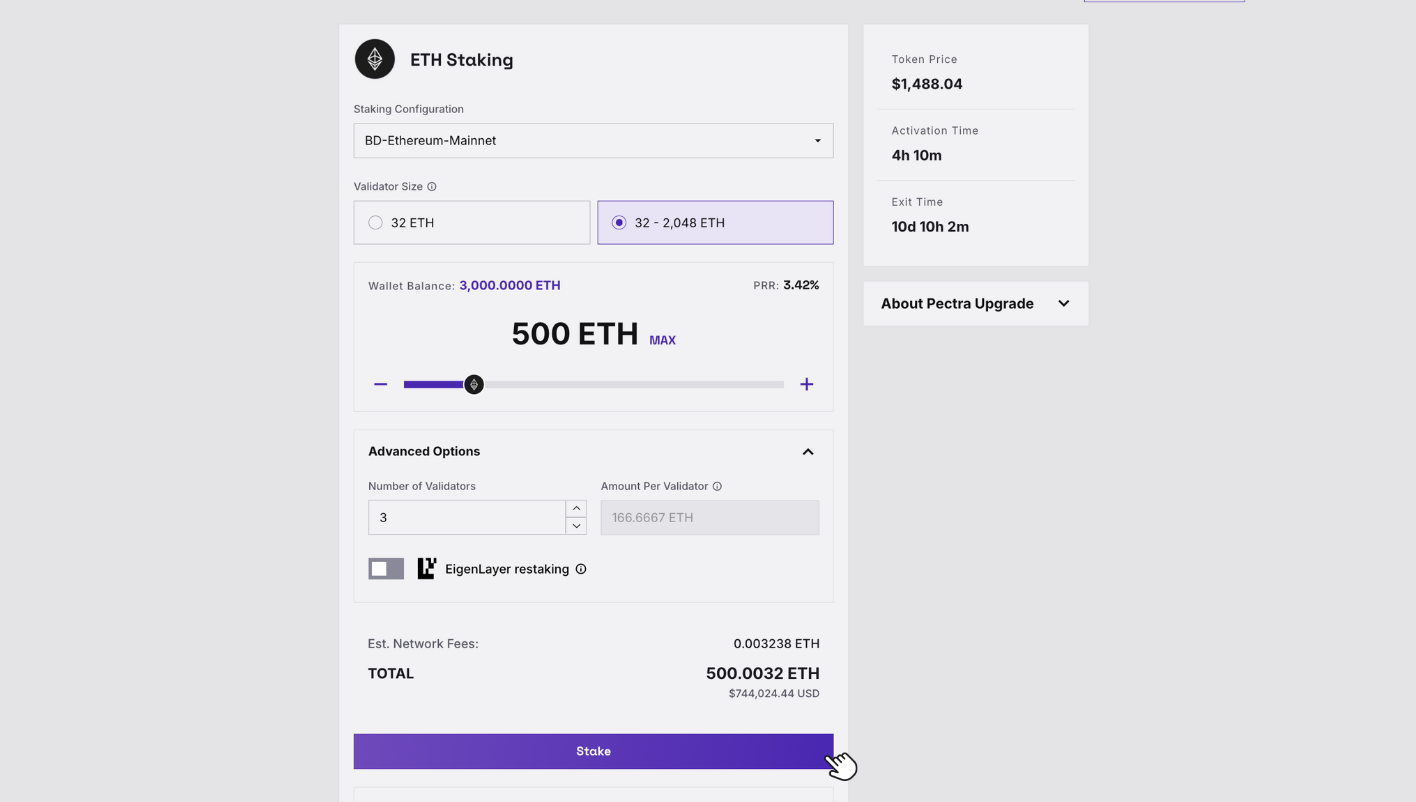
        <li>Click <strong>Stake</strong> to initiate the transaction.</li>
        <div class="step-image">
          <img src="https://files.readme.io/8fe3c39408086b0ea5cf914336917dfcfe1cb74c8bd2e93a25bc93c7ba5ae94f-Screenshot_2025-04-14_at_13.44.03.png" width="740">
        </div>

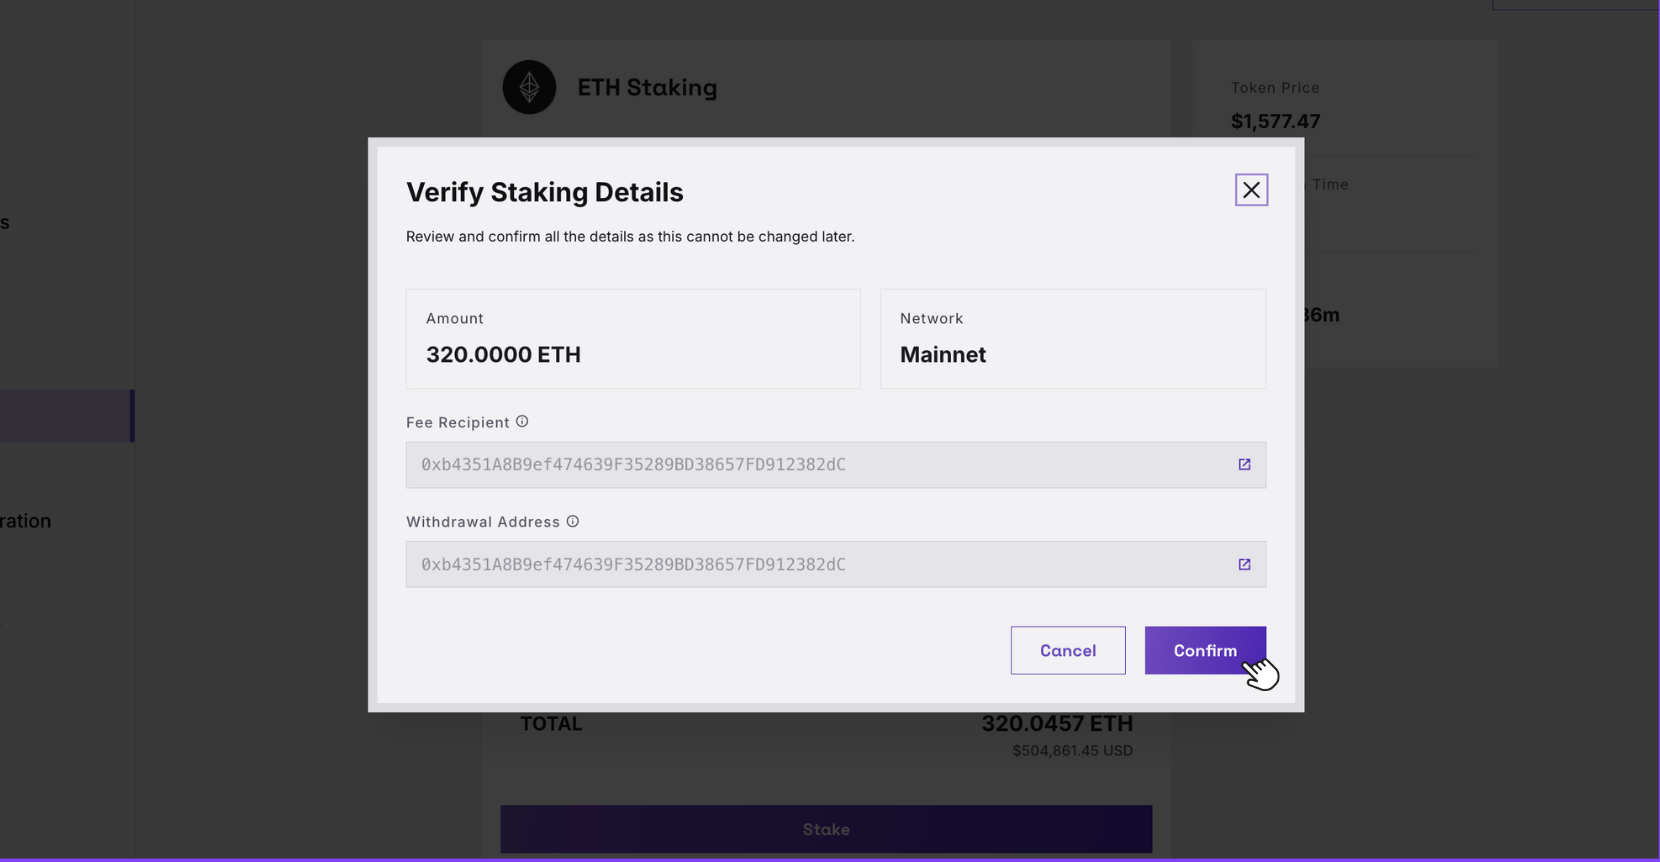
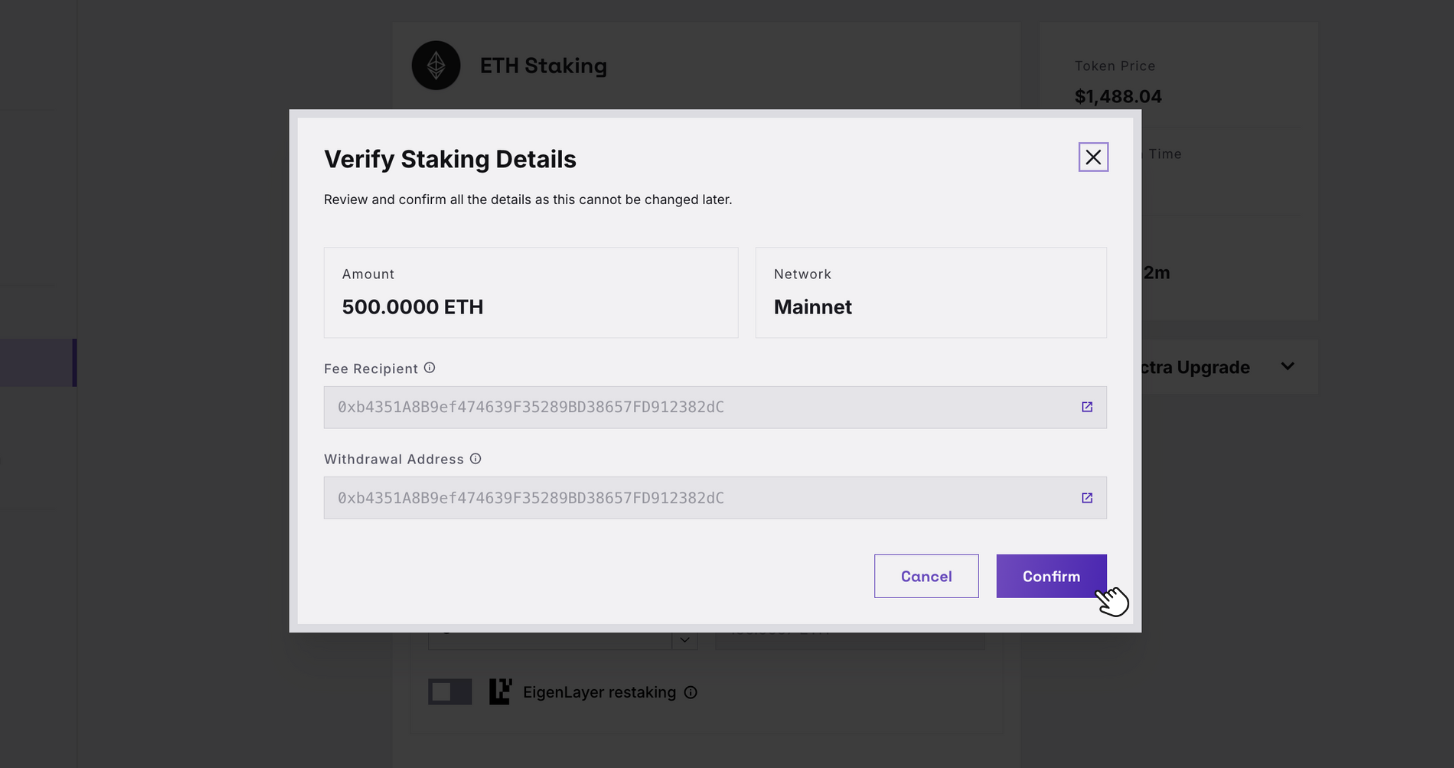
        <li>Review and confirm all the staking details.</li>
        <div class="step-image">
          <img src="https://files.readme.io/9da624ae2c6ab46deb25a8dbc17f3d08e6380fc6708f2400b41940ad4333d065-Screenshot_2025-04-10_at_22.05.02.png" width="740">
        </div>
      </ol>
    </div>

<div class="tab-content content2">
  <blockquote>
    <strong>📘 About Pectra</strong><br>
    The Pectra upgrade introduces new flexibility and efficiency to Ethereum staking by allowing ETH holders to consolidate multiple validators and stake up to 2,048 ETH on a single validator.
  </blockquote>

  <ol>
    <li>
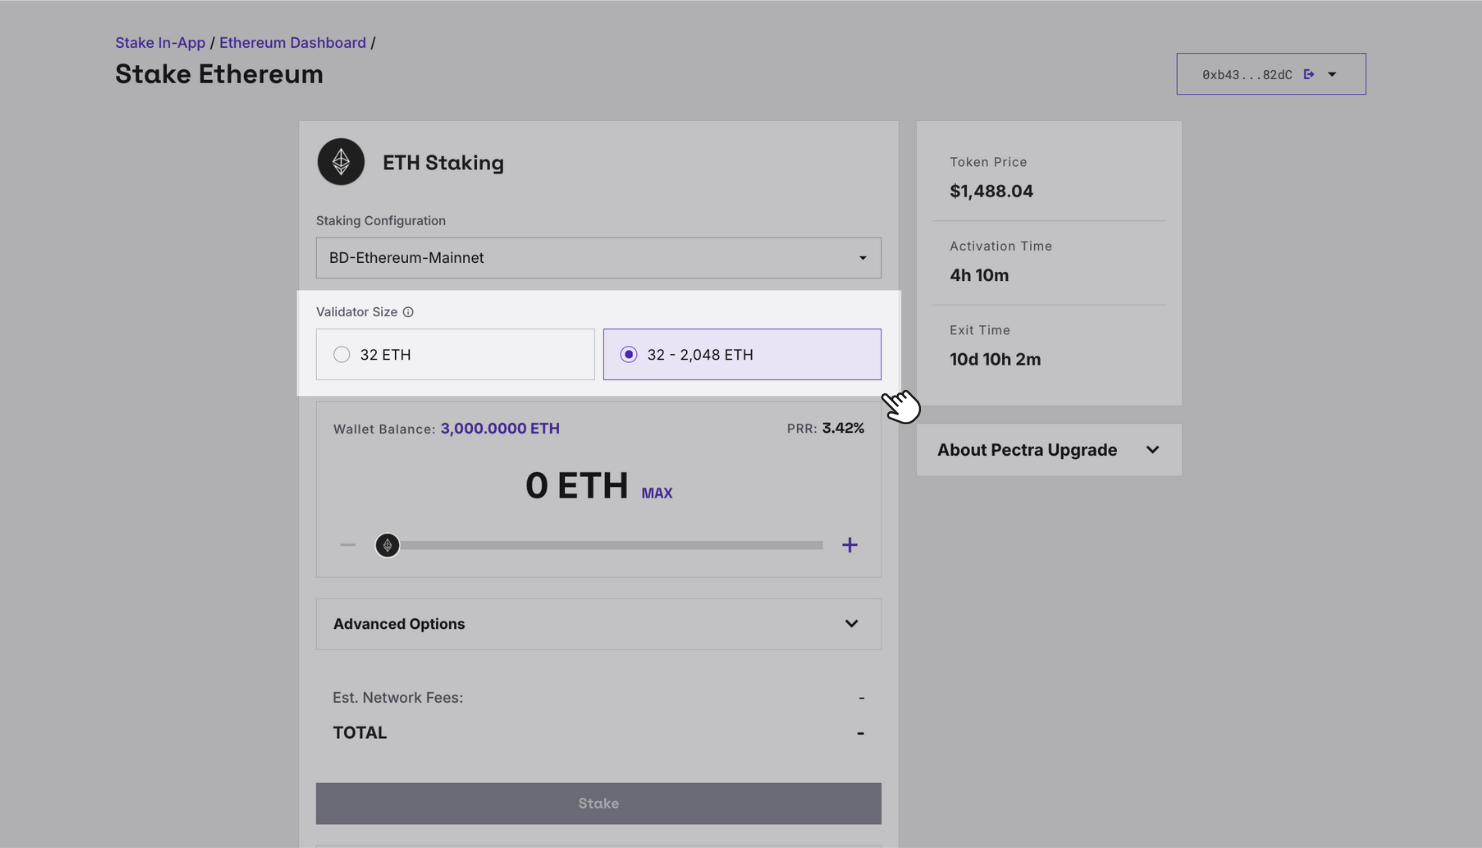
      Choose the validator size between <strong>32</strong> or <strong>32–2,048</strong> ETH. Key differences:
      <ol type="a">
        <li>
          If you choose 32 ETH:
          <ul>
            <li>👍 <strong>Auto reward sweeps</strong> to your withdrawal address.</li>
            <li>Only one validator per 32 ETH. More ETH = more validators.</li>
          </ul>
        </li>
        <li>
          If you choose 32–2,048 ETH:
          <ul>
            <li>👍 <strong>Benefit from auto compounding</strong> with higher balances.</li>
            <li>You can choose up to 2,048 ETH per validator.</li>
          </ul>
        </li>
      </ol>
      <div class="step-image" style="margin-top: 1rem;">
        <img src="https://files.readme.io/9a1744de1b7f482c03562afb1e07224a877e4e6c185742f6621186c8de041e0a-Screenshot_2025-04-10_at_23.48.19.png" width="740">
      </div>
    </li>

    <li style="margin-top: 2rem;">
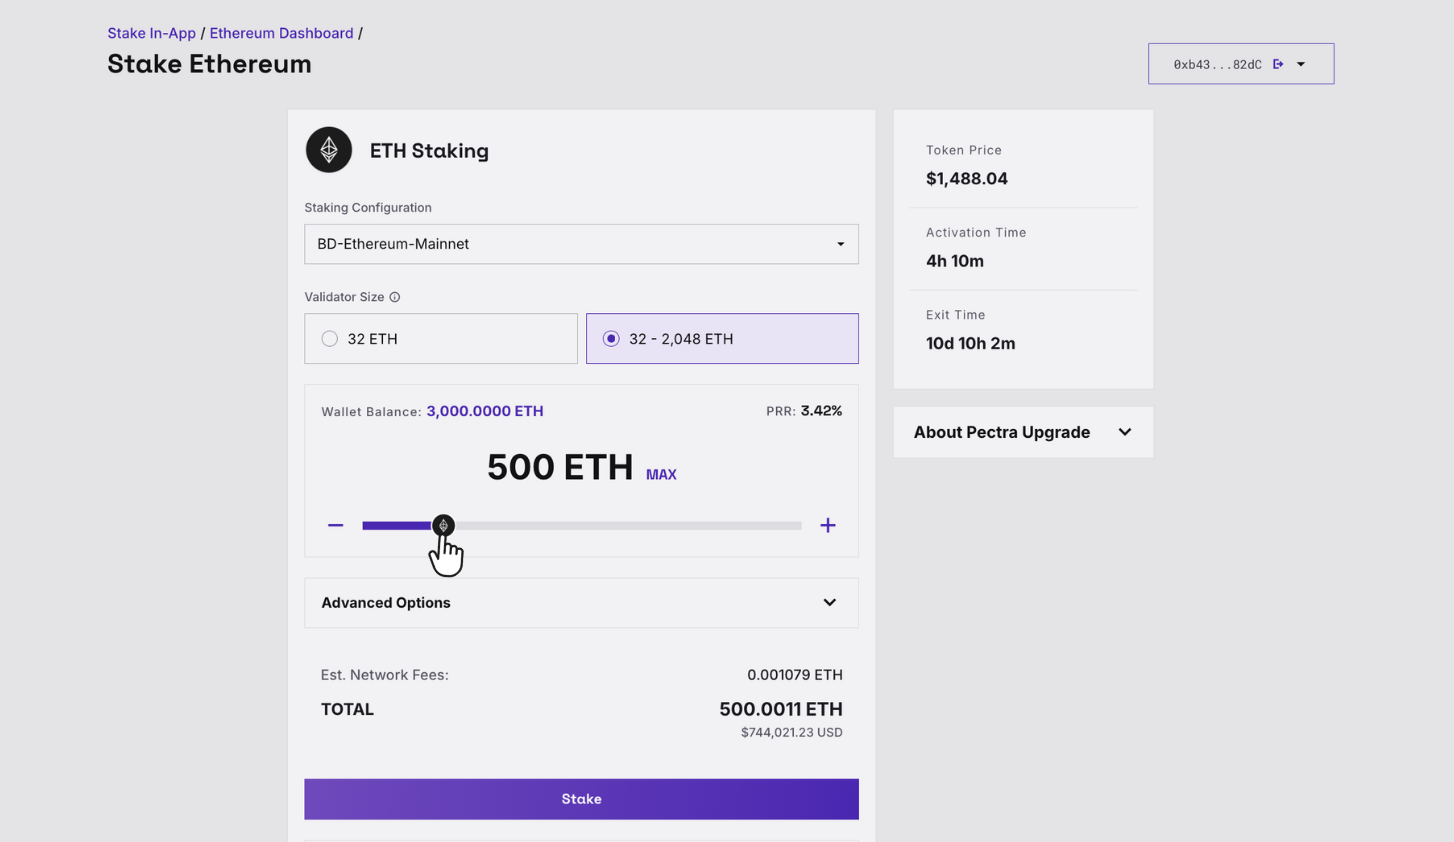
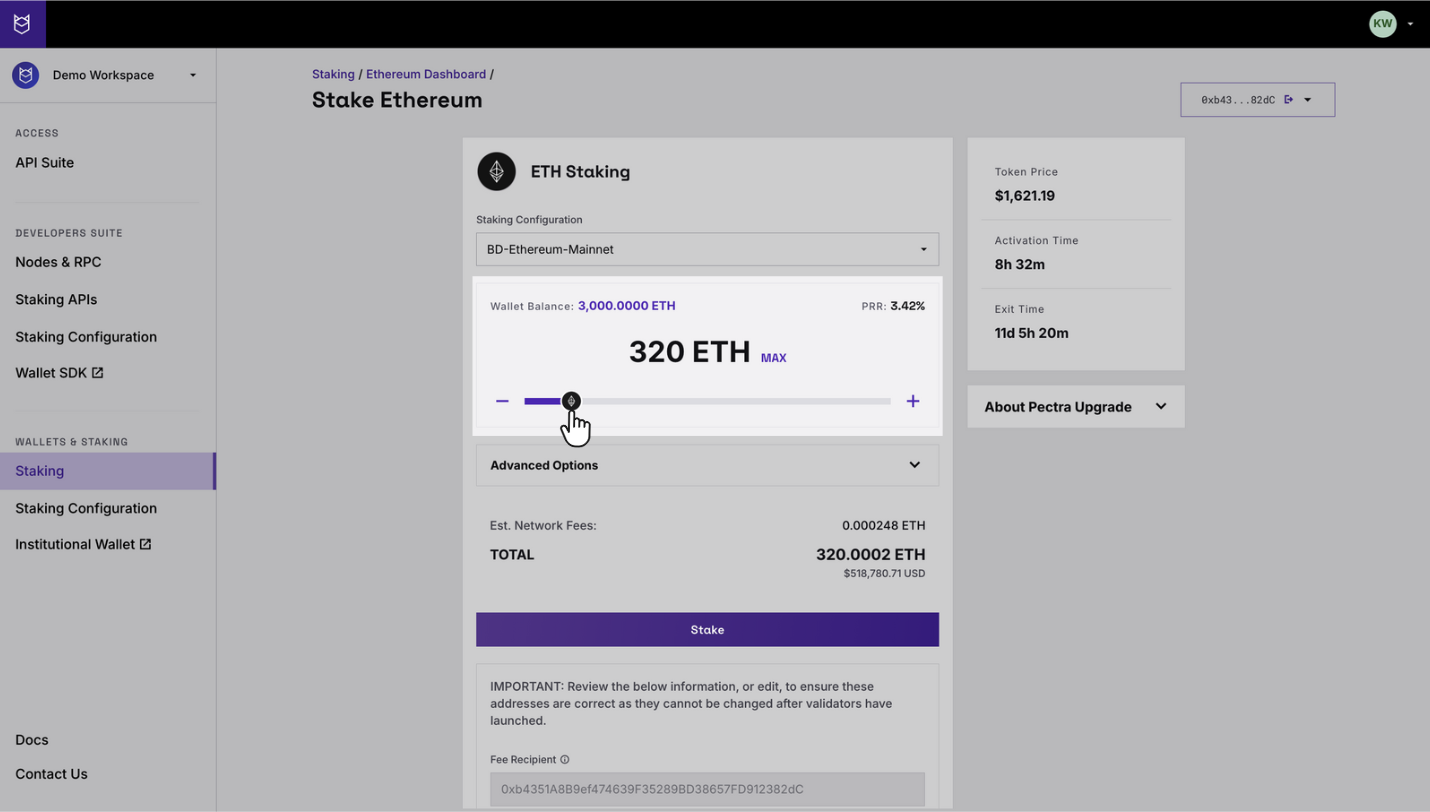
      Specify the staking amount using the slider.
      <div class="step-image" style="margin-top: 1rem;">
        <img src="https://files.readme.io/ed42bdc2f9780d16378368860c95ac1334fba5ce7890306dc71402c962883f1c-Screenshot_2025-04-10_at_23.50.33.png" width="740">
      </div>
    </li>

    <li style="margin-top: 2rem;">
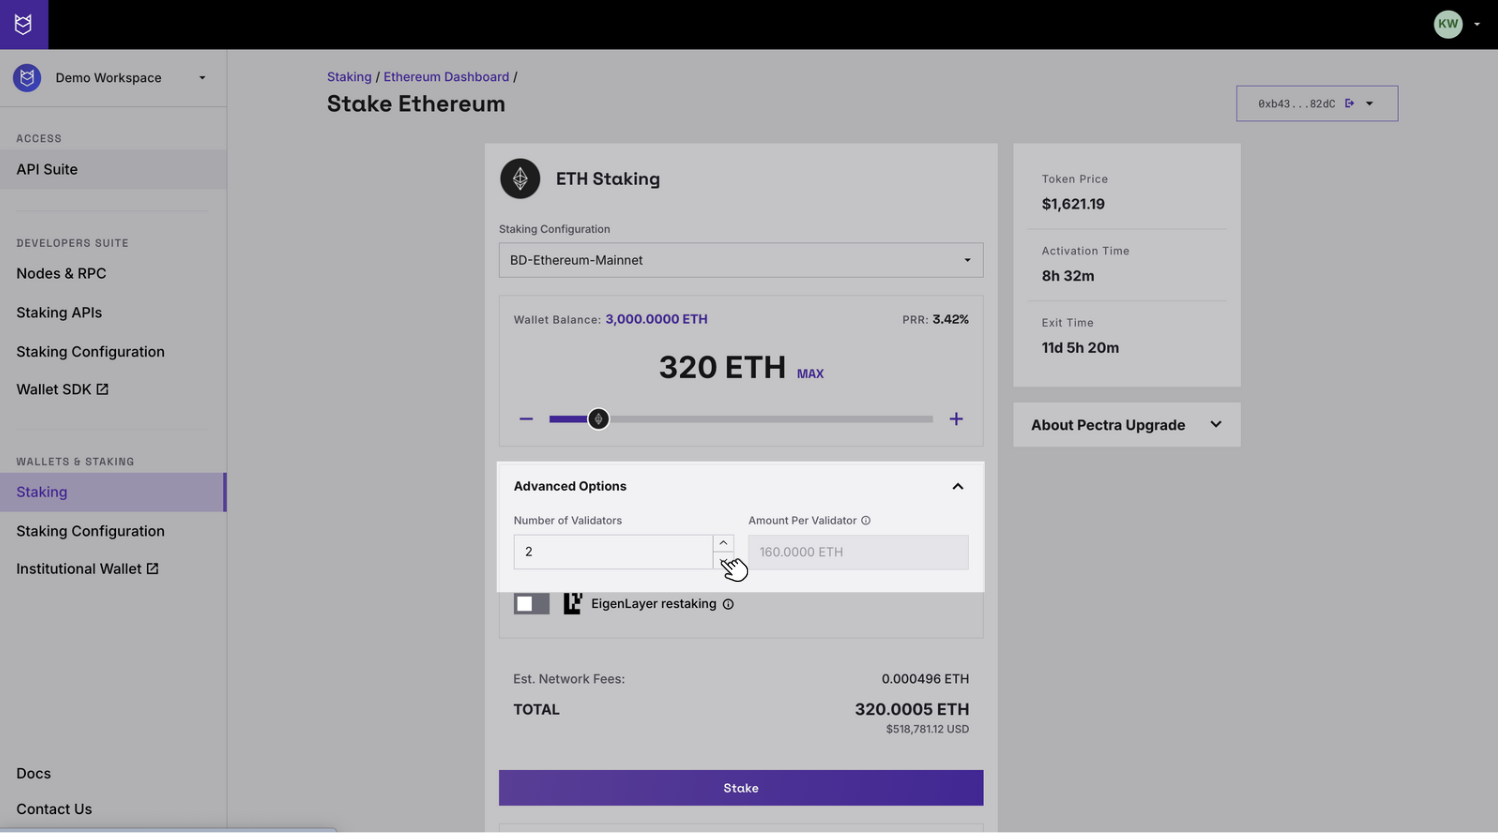
      In the <strong>Advanced Option</strong>, the number of validators is set based on the staked ETH amount. You can increase or decrease the validator count as needed. Blockdaemon recommends 150–500 ETH per validator to maximize compounding rewards, but any amount between 32–2,048 ETH is accepted.
      
              <div class="callout-box">
    <h3>Info</h3>
    <p>This step is only applicable if you choose <strong>32–2,048 ETH validator size</strong>.</p>
  </div>
      <div class="step-image" style="margin-top: 1rem;">
        <img src="https://files.readme.io/7773f6efd421323786114e1d016afc48c75f778767d494f1f4368e3faafae76f-Screenshot_2025-04-10_at_23.53.13.png" width="740">
      </div>
    </li>
    <li style="margin-top: 2rem;">
      Review the below information:
      <ol class="step-sublist" type="a">
        <li>
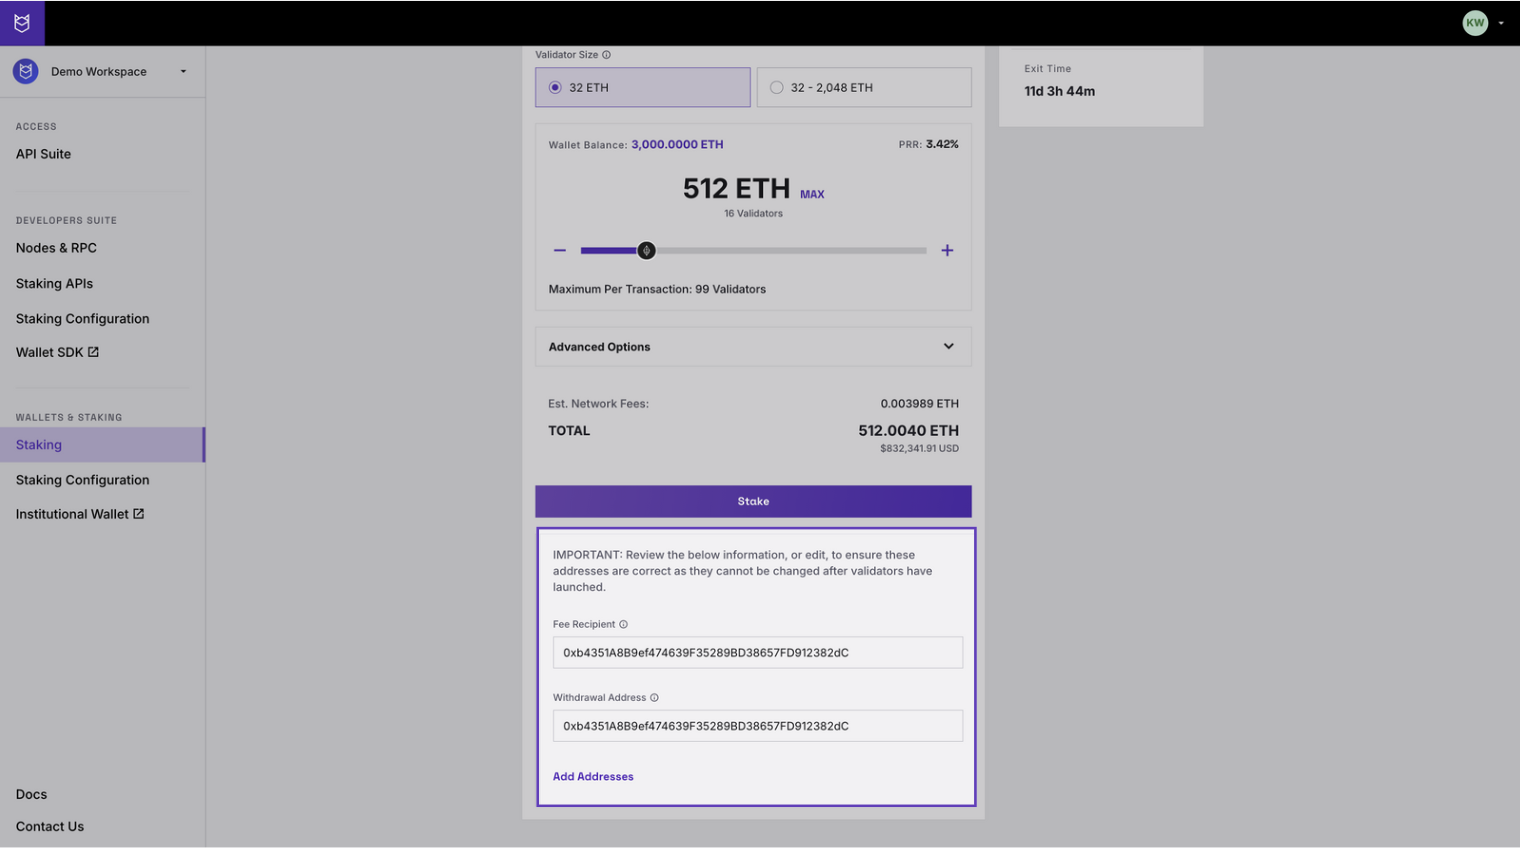
          Set the <strong>Fee Recipient</strong> to receive transaction fees and MEV rewards (if enabled). The default address is the one you set with your Customer Success Manager during <a href="https://docs.blockdaemon.com/docs/how-to-stake-copy#step-1-onboarding-the-staking-api">onboarding</a>. If you did not set up an address with your Customer Success Manager, your connected wallet address will be the default address.
        </li>
        <li>
          Set a <strong>Withdrawal Address</strong> to receive rewards and withdraw your staked ETH. Rewards include protocol, transaction fee, and MEV rewards (if enabled). The default address displayed is your connected wallet address. <br /><br /> Select <strong>Add Addresses</strong> to assign different withdrawal addresses.
        </li>
      </ol>
  <div class="callout-box">
    <h3>Info</h3>
    <p>This step is only applicable if you choose <strong>32 ETH validator size</strong>.</p>
  </div>
      <div class="step-image">
        <img src="https://files.readme.io/c8ac6fd6d5119560b9a1d0731e8b157fb1b3bf0b96cad3bf13dd613dbb58e9f7-Screenshot_2025-04-14_at_13.50.56.png" width="740">
      </div>
    </li>

    <li style="margin-top: 2rem;">
      Click <strong>Stake</strong> to initiate the transaction.
      <div class="step-image" style="margin-top: 1rem;">
        <img src="https://files.readme.io/9c36686a7a02d0c589d33ce058a485cc053f760f151dd48ba95da959238f79cc-Screenshot_2025-04-10_at_23.55.47.png" width="740">
      </div>
    </li>

    <li style="margin-top: 2rem;">
      Review and confirm all the staking details.
      <div class="step-image" style="margin-top: 1rem;">
        <img src="https://files.readme.io/9430ab566b9b079c2db66fa0839a87e023ae7ad5fbd9854b0faebbb481e0b264-Screenshot_2025-04-10_at_23.56.35.png" width="740">
      </div>
    </li>
  </ol>
</div>
  </div>
</div>
`}</HTMLBlock>

## Step 5: Confirm the Transaction

1. Preparing the validators for deployment.

<Image align="center" border={false} width="740px" src="https://files.readme.io/c1727a633785f07738c98d3596eb75121faf88259aa1614abd35893703f3c057-Screenshot_2025-04-11_at_00.02.28.png" />

2. Sign the transaction in your wallet:
   1. The unsigned validator deposit transaction will be sent to your connected wallet.
   2. Ensure the **To** address matches the Blockdaemon batch contract address for the network you're staking on.
   3. Verify that the amount matches the value you selected in the Blockdaemon app.
   4. Once everything looks good, sign the transaction.\ <br />
3. Navigate back to the Blockdaemon app to check that your transaction has been broadcast and is being confirmed on the network.

<Image align="center" border={false} width="740px" src="https://files.readme.io/94cad2589561d69048aad451c4364c5aa3be8abfd0982fd6b0c235ca3be01d52-Screenshot_2025-04-11_at_00.06.28.png" />

4. Once the network confirms the transaction, your ETH validator(s) are deposited to. You can view them in the [Ethereum Staking Dashboard](https://docs.blockdaemon.com/docs/ethereum-staking-dashboard) and see that they are in a `deposited` state. The **[Ethereum Dashboard](https://docs.blockdaemon.com/docs/ethereum-dashboard)** can be used to check your validator's latest on-chain status.

<Image align="center" border={false} width="740px" src="https://files.readme.io/923bd1fdacabecfa0438a531d5a131d21792dc7862454f5ff01c90accbee8e47-Screenshot_2025-04-11_at_00.16.32.png" />

> 🚧 Note
>
> The time it takes validators to become active and start earning rewards is variable, and is dependent on the current length of [**the protocol activation queue**](https://www.validatorqueue.com/). An estimation of the activation time is also shown in the information panel on the right hand side of the staking page.

## 👋 Need Help?

Contact us through [email](mailto:support@blockdaemon.com) or our [support page](https://www.blockdaemon.com/support) for any issues, bugs, or assistance you may need.