
How to Stake EVMOS (Evmos)
Learn how to stake EVMOS (Evmos) using Blockdaemon in this step-by-step guide.
Evmos is an application-agnostic blockchain fully compatible with Ethereum and interoperable with other BFT chains through IBC. Evmos allows projects to run Ethereum as a Cosmos application-specific backend. EVMOS is the native cryptocurrency token on the Evmos network and is easy to stake with Blockdaemon.
Evmos is built to be scalable and proof-of-stake based, running on top of the Tendermint Core consensus engine. This lets developers use Ethereum’s specific capabilities while enjoying Tendermint’s proof-of-stake implementation.
Follow the steps below to stake your EVMOS:
Step 1 – Access Your Wallet
- For this example, we are using a Keplr wallet browser extension.
- If you don’t have the Keplr wallet, you can download the Keplr wallet here.
- This guide is broadly applicable to other wallets, although specific details may vary.
Step 2 – Select the Evmos Blockchain
- At the top of your Keplr wallet browser extension, select the blockchain dropdown menu.
[block:image]
{
"images": [
{
"image": [
"https://files.readme.io/3c83ca3-image.png",
null,
null
],
"align": "center",
"border": true
}
]
}
[/block] - Scroll down until you see the Evmos network, and select it.
- This will update your wallet to show your Evmos balance.
- If you do not have Evmos tokens in your Keplr wallet, you will need to deposit some before staking.
Note:
You may be eligible for the Evmos Rektdrop. Check here for details on Claiming Your Evmos Rektdrop.
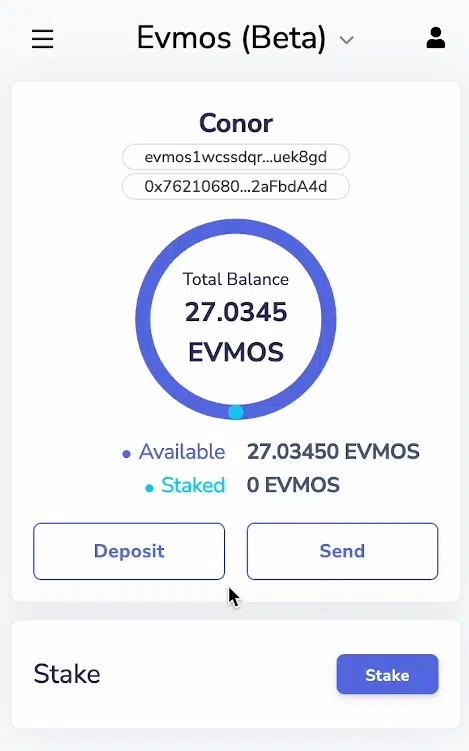
Step 3 – Select the Blockdaemon Validator
- Click the Stake button.
- This will take you to a list of active validators
- Search for Blockdaemon by using ctrl+f (windows) or command+f (mac) and entering Blockdaemon.
[block:image]
{
"images": [
{
"image": [
"https://files.readme.io/bfe9710-image.png",
null,
null
],
"align": "center",
"border": true
}
]
}
[/block] - Click the Manage > button corresponding to the Blockdaemon validator.
This will display the Blockdaemon validator popup.
[block:image]
{
"images": [
{
"image": [
"https://files.readme.io/1e72162-image.png",
null,
null
],
"align": "center",
"border": true
}
]
}
[/block]
Step 4 – Delegate Your Evmos to Blockdaemon
- Click the Delegate button in the Blockdaemon validator popup window.
- This will display a warning message and allow you to enter an amount to delegate.
[block:image]
{
"images": [
{
"image": [
"https://files.readme.io/6fbb9ed-image.png",
null,
null
],
"align": "center",
"border": true
}
]
}
[/block] - Enter the amount of EVMOS you want to delegate.
- Click the Delegate button.
- This will open your Keplr wallet browser extension.
[block:image]
{
"images": [
{
"image": [
"https://files.readme.io/11022e1-image.png",
null,
null
],
"align": "center",
"border": true
}
]
}
[/block] - If you are happy to proceed, click the Approve button.
- You will then need to wait a few moments while the transaction is processing.
- Once completed, click manage on the Blockdaemon validator again. The popup window will be displayed, showing the amount you have delegated with Blockdeamon.
[block:image]
{
"images": [
{
"image": [
"https://files.readme.io/bd5fc0d-image.png",
null,
null
],
"align": "center",
"border": true
}
]
}
[/block]
Congratulations, you are now successfully participating in the Evmos network! ![]()
You can also check out our Evmos (EVMOS) staking walkthrough video.
Interested in running your own Evmos Validator? Send us a message to get started.
Updated 4 months ago